This post may contain affiliate links. Please read our disclosure policy.
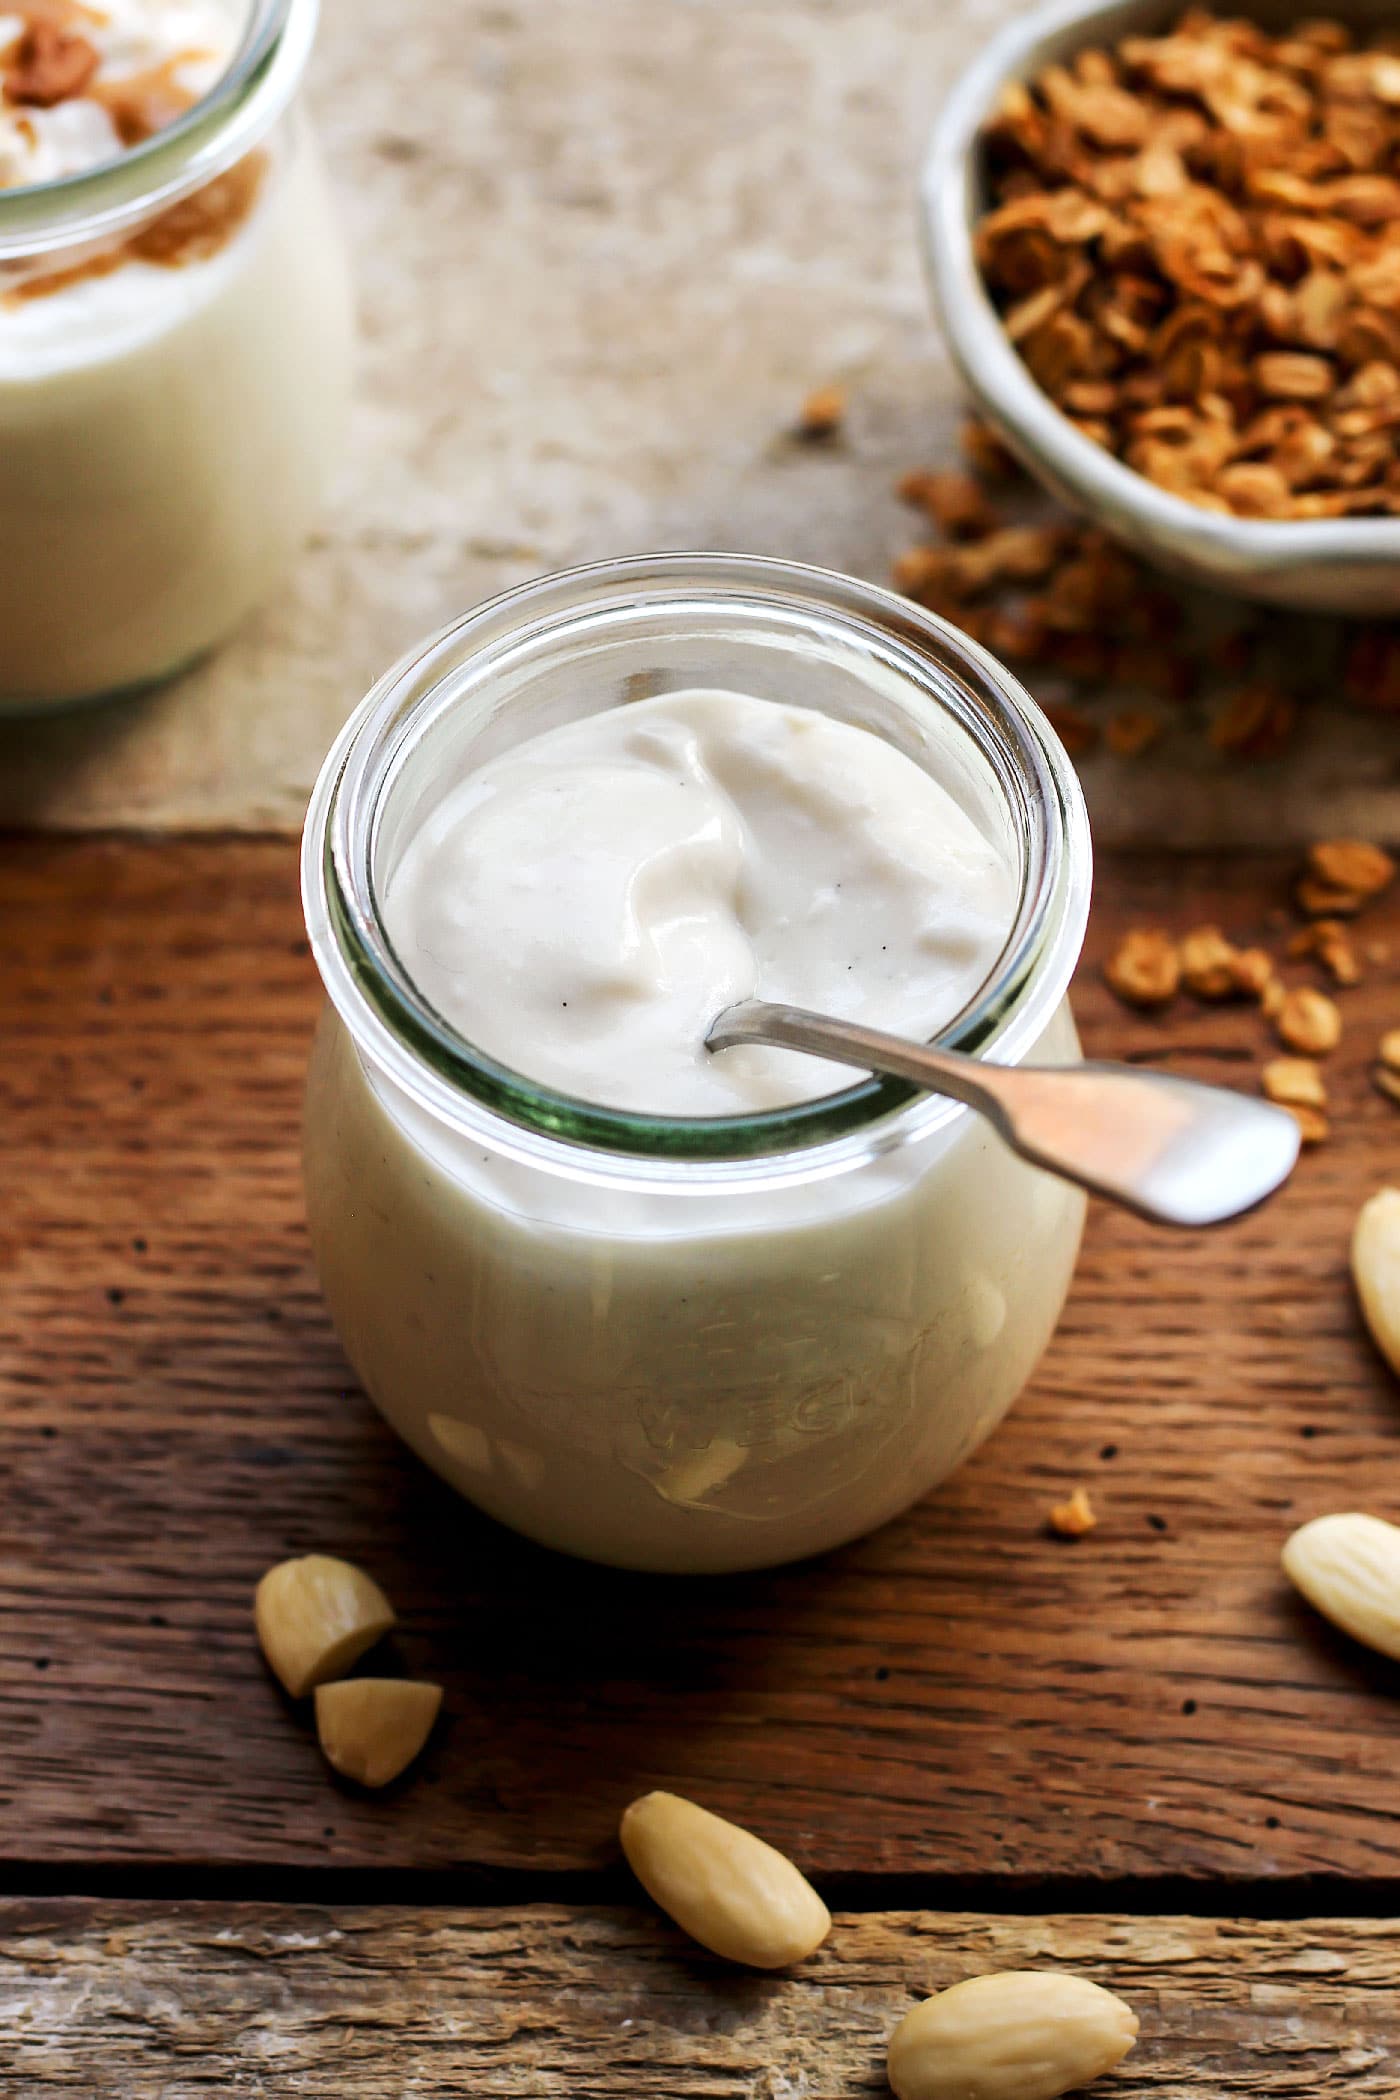
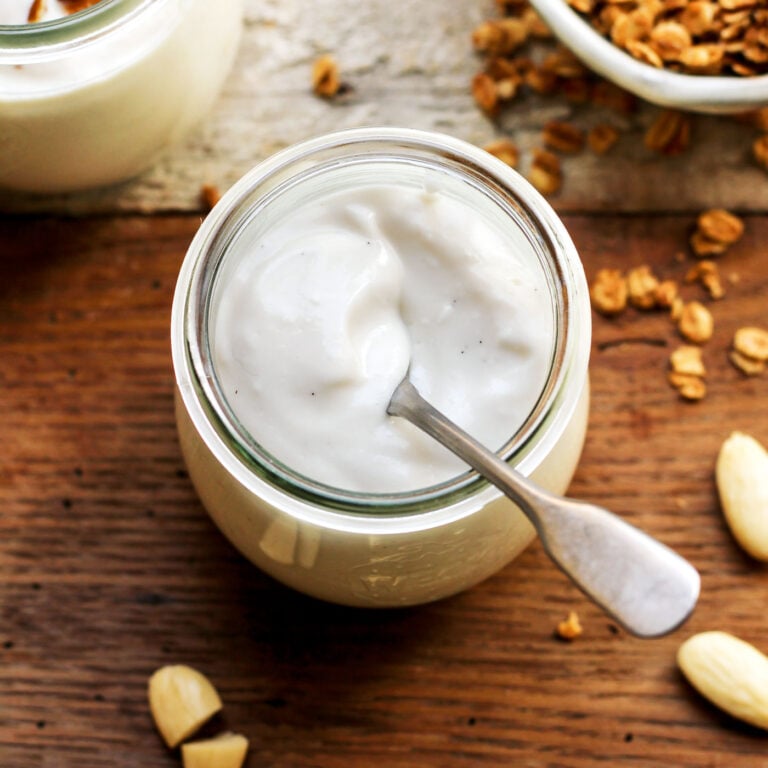
This plant-based yogurt is thick, creamy, slightly tart, and made with 100% homemade almond milk! If you are looking for the creamiest almond milk yogurt, look no further! Just 5 ingredients, dairy-free, and so easy to make!

📘 Introduction
Many of you have been asking for a soy and coconut-free yogurt recipe. After using 6 pounds of almonds for testing, here it is!
I didn’t want to go with cashews here simply because it would have made the yogurts too heavy, and I wanted something light. Almonds are great, but there was one problem when making yogurt from almond milk: it never thickens.
So, after checking the ingredient list of tens of vegan yogurts and reading reviews about them, I started to work with thickeners.
I first went with pectin, but it’s a bit messy to work with, and I was not getting a satisfying texture. In the end, I went with a mix of three thickeners: locust bean gum, also known as carob bean gum, xanthan gum, and a pinch of agar-agar. When combined together, they form a gel. It’s science, so don’t ask me how it works exactly! The main point is that it results in thick and creamy yogurt!
If you are looking for a vegan yogurt recipe that doesn’t make use of gums, check out this Cashew & Almond Yogurt recipe.
👨⚕️ Health Benefits
Yogurts are packed with good live bacteria, known as probiotics. They help boost the immune system and improve digestion. Since these yogurts are made from 100% almonds, they are naturally soy-free, refined sugar-free, dairy-free, and gluten-free!
🥣 How to Make Vegan Almond Milk Yogurt
Before starting: Please don’t try to substitute or omit any ingredient here. It took a lot of tests to get this recipe right, and just a small change will affect the texture of the yogurt. For example, if using cornstarch or arrowroot, the yogurts will have a slimy texture, so stick to locust bean gum. If using too much xanthan gum, the yogurts tend to be gelatinous, etc… Don’t be scared by this recipe, though. It’s actually very easy!
You will need just 5 ingredients to make your own almond milk yogurt:
- Almonds – Use raw almonds, not roasted ones. You can use blanched or whole almonds. It doesn’t really matter.
- Locust Bean Gum – The main thickener. As opposed to cornstarch or tapioca starch, locust bean gum won’t give the yogurt a slimy texture.
- Xanthan Gum – Xanthan gum helps thicken everything a bit more and improves the mouthfeel.
- Agar Agar – Agar gives more structure to the yogurt. We are only using a very small amount of agar here (1/32 tsp) because it’s very powerful, and we don’t want a jelly yogurt texture.
- Yogurt Starter – You can use powdered yogurt starter or a few tablespoons of your favorite vegan yogurt.
- Optional: vanilla bean or vanilla extract, maple syrup.
Making the Almond Milk
Alright, let’s do it! We will first prepare the almond milk because we are going to do everything from scratch. Start by soaking the almonds for at least 6 hours, preferably overnight.
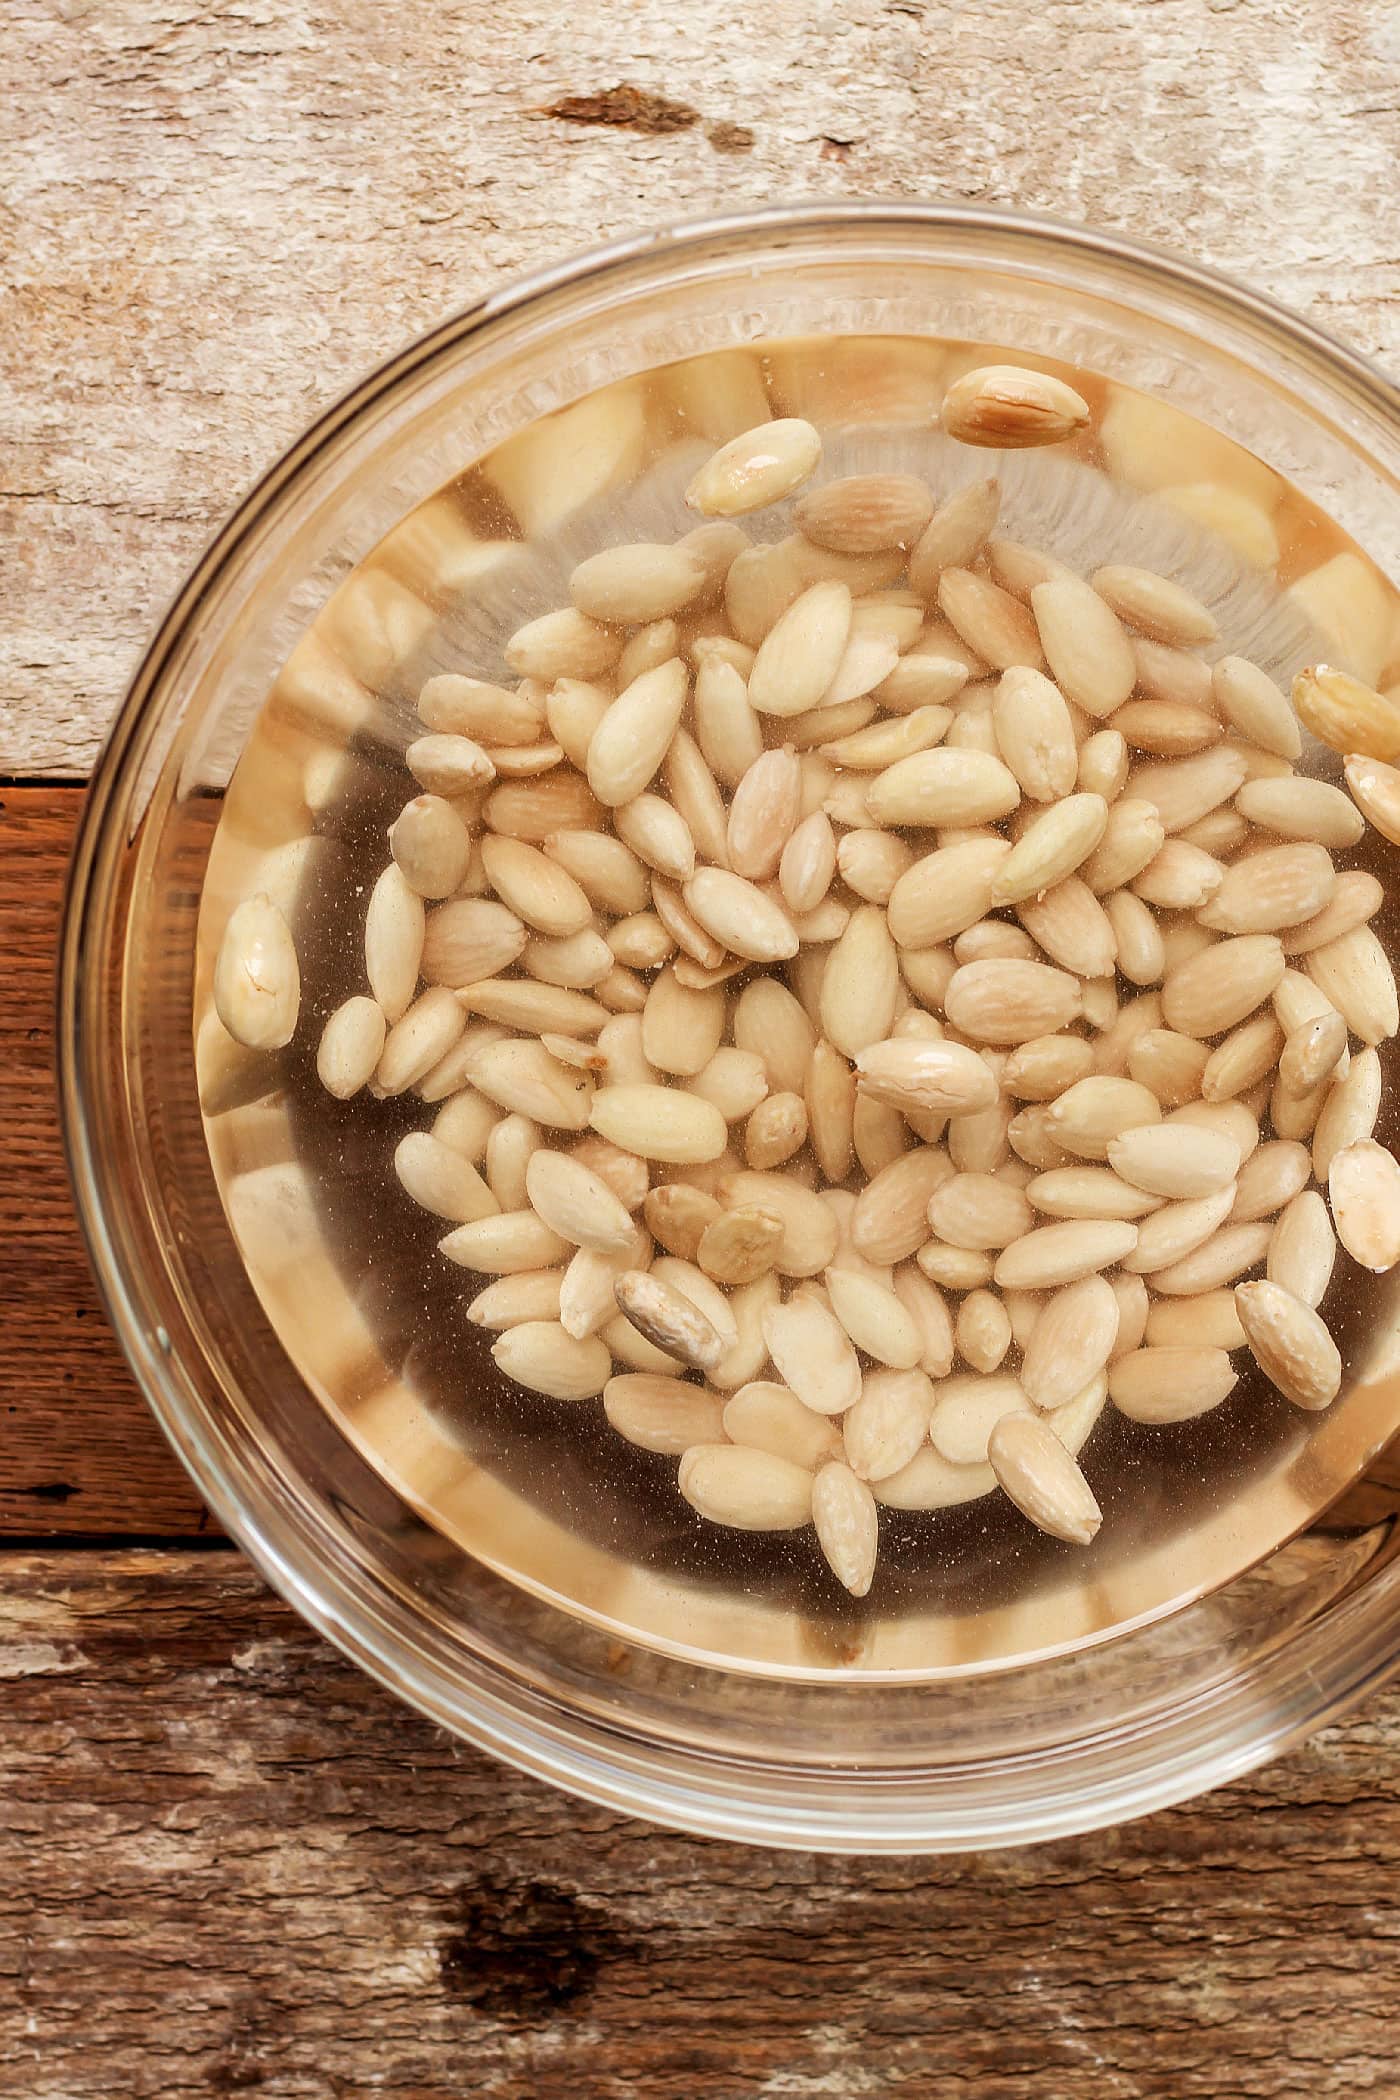
Once your almonds have soaked overnight, drain them and place them in a blender with filtered water. Blend on high speed until smooth, about 30-40 seconds. For exact quantities, please check the recipe at the end of this post.
Then, strain the almond milk using a nut milk bag. Just squeeze the bag to release the milk. The almond pulp can be discarded or saved for other recipes. The almond milk is ready to use. Now comes the easiest part: making the yogurts!
Thickening the Milk
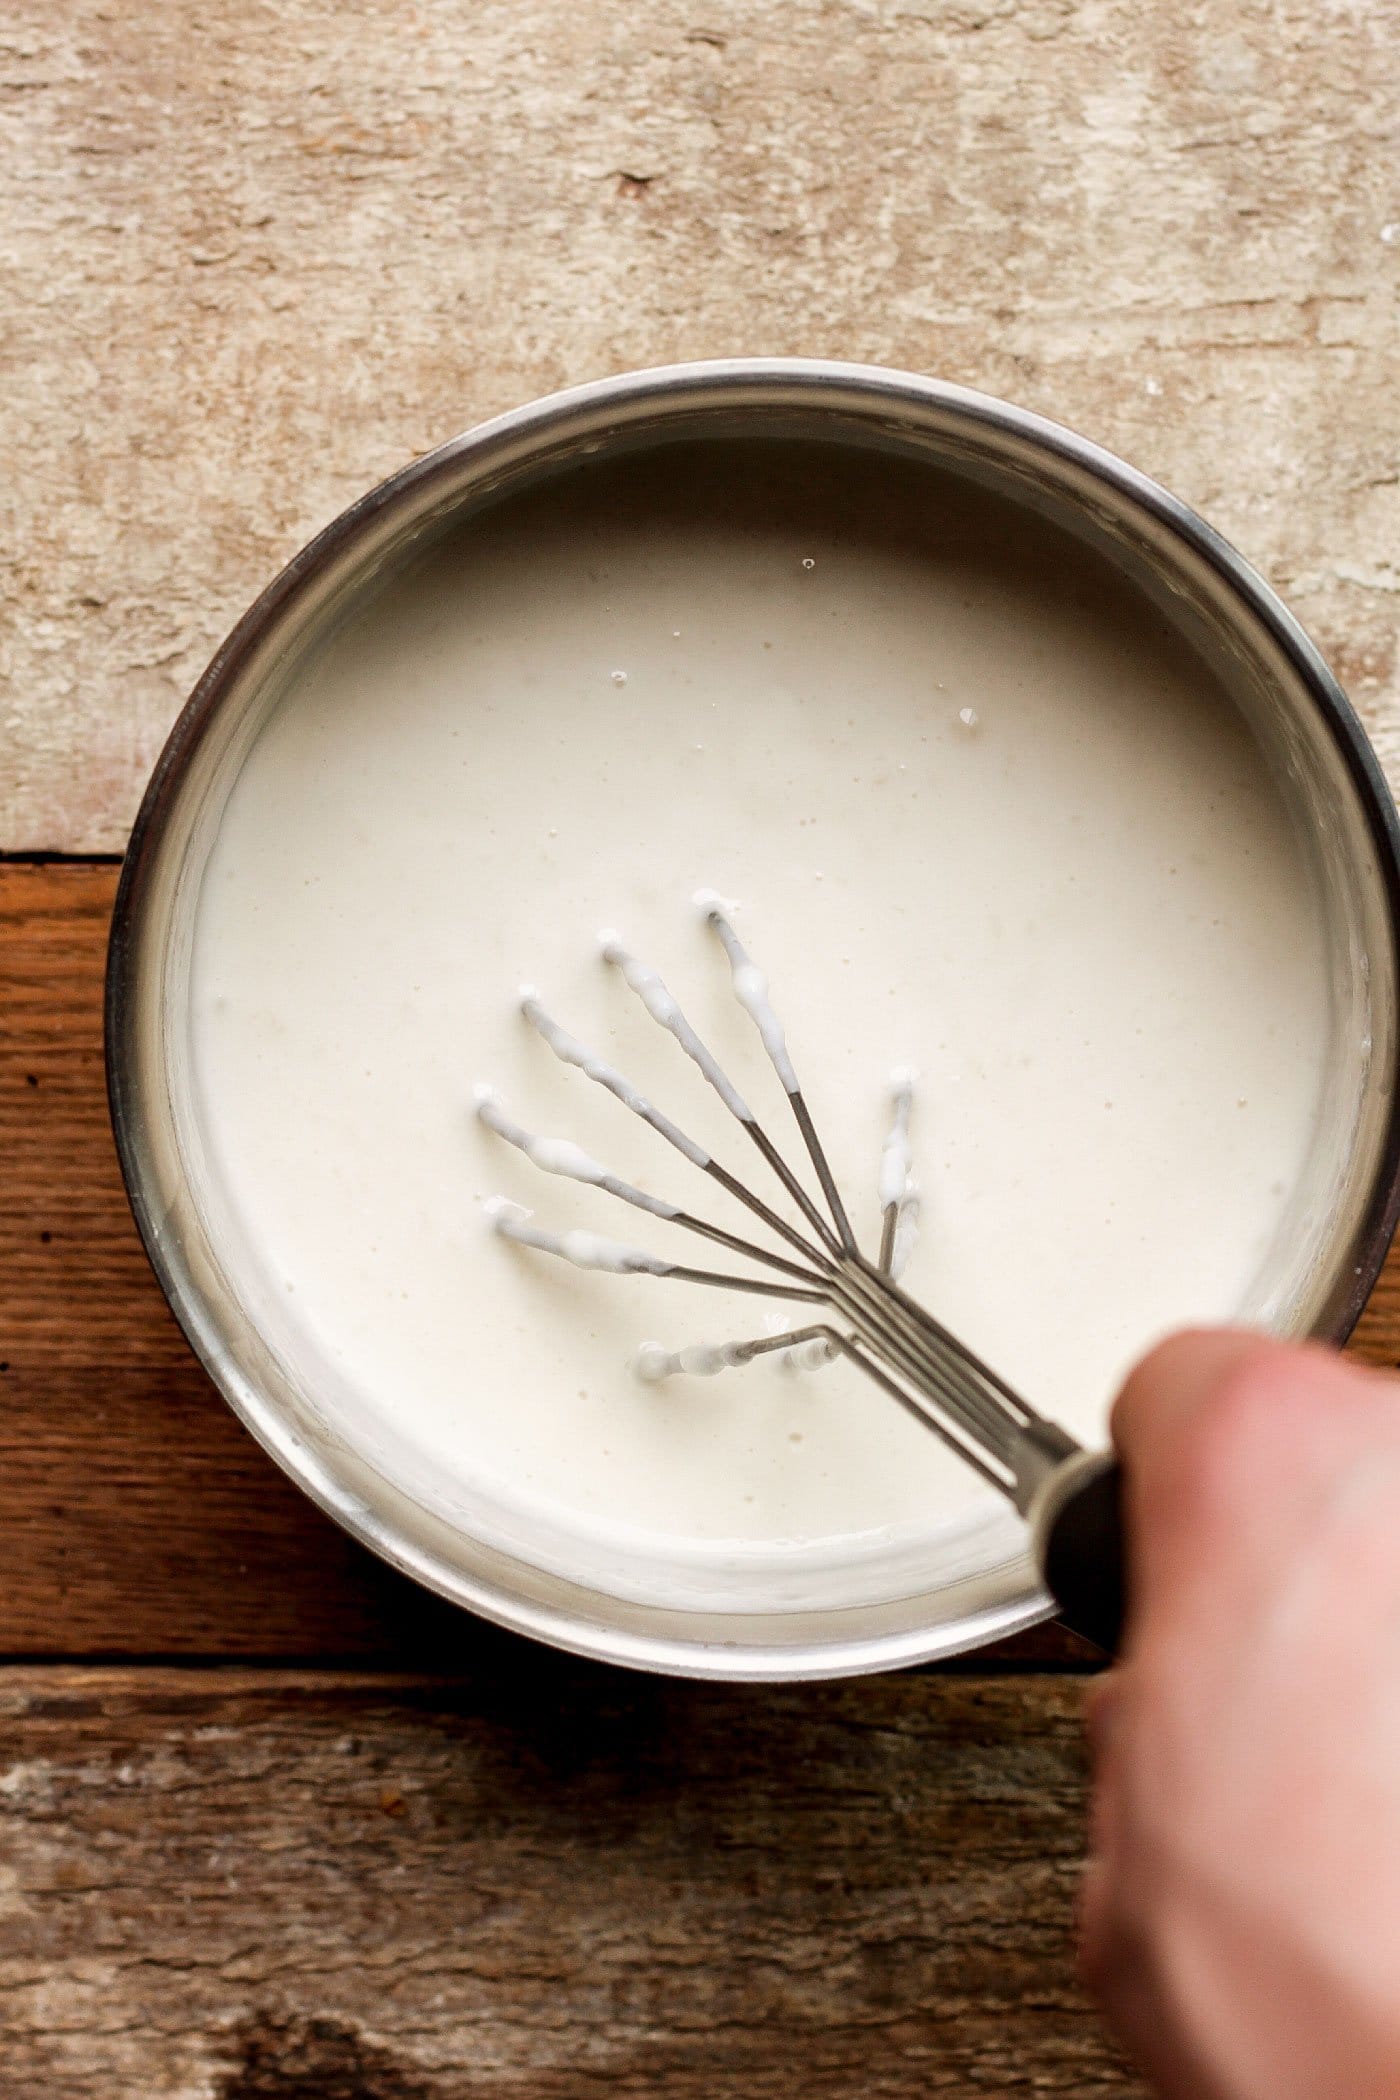
Combine your freshly made almond milk with the locust bean gum, xanthan gum, and agar agar in a saucepan and whisk until everything is well combined. Then heat to 185°F (85°C) to activate the gums and agar. Remove from heat and let cool at room temperature.
Once it reaches 110°F (43°C), stir in the yogurt starter or 3 tbsp of non-dairy yogurt and whisk. I used only half a packet of this starter since one packet is given for 4 cups of milk. Be aware the almond milk will need to be churned as it will have already thickened a bit. This is normal. Whisk well to break any possible lumps and give the almond milk a smooth texture again.
Culturing
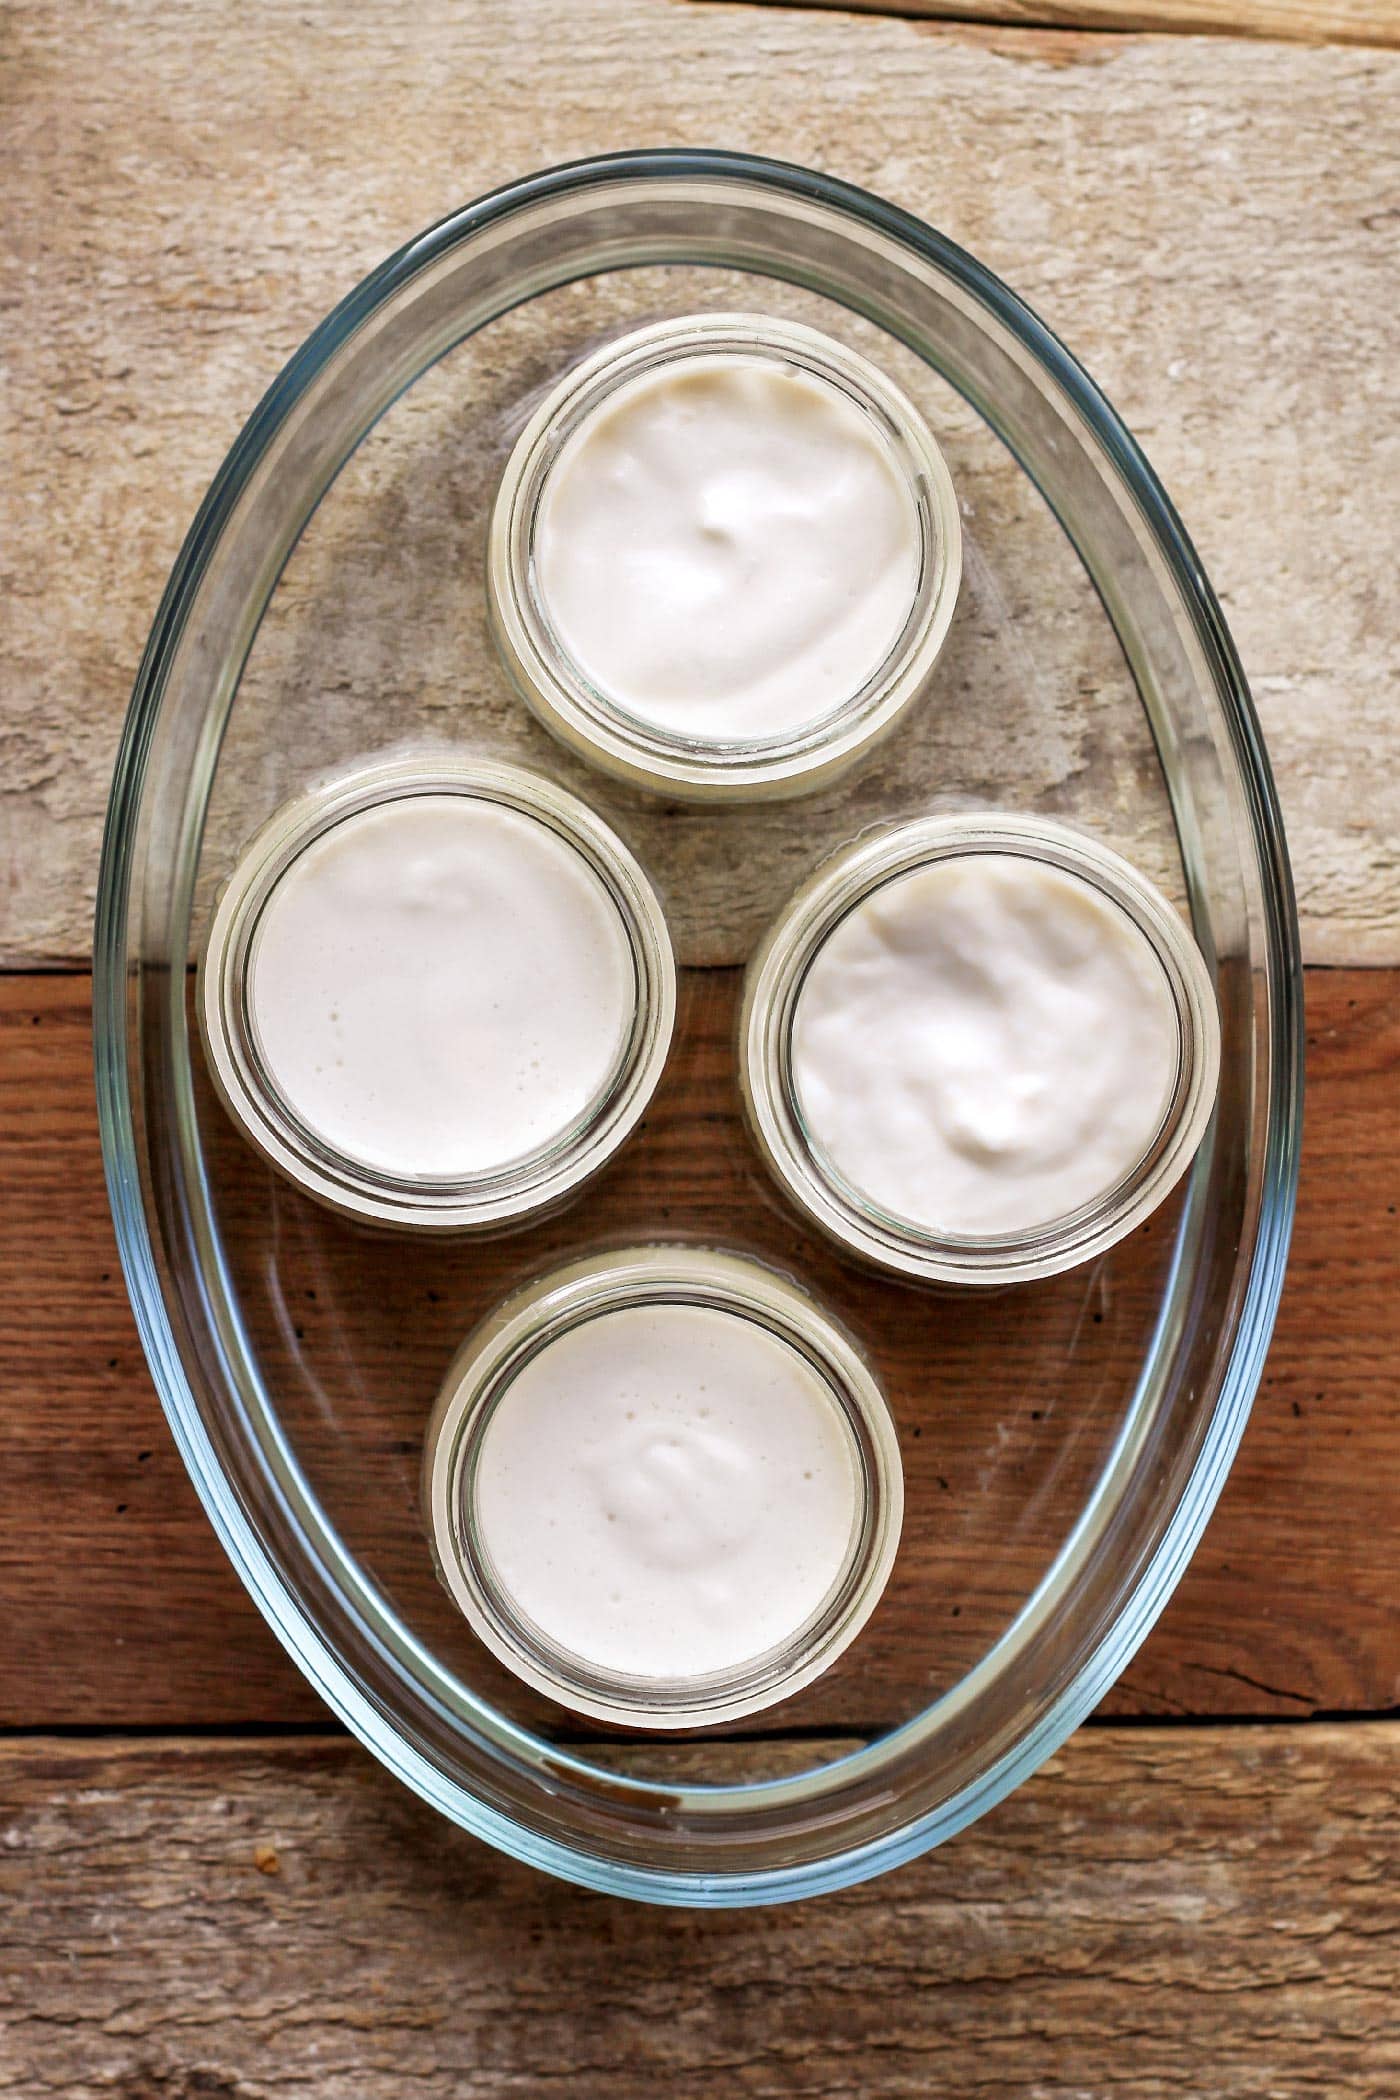
You can now pour the almond milk into glass jars and let the yogurts culture for 5-6 hours at 105-115°F (40-45°C). If you don’t have a yogurt maker, you can use your oven. Place the jars in a dish filled with warm water and put them in the oven with the light on or set at 105°F for 5 hours. It’s the technique I used, and it worked great!
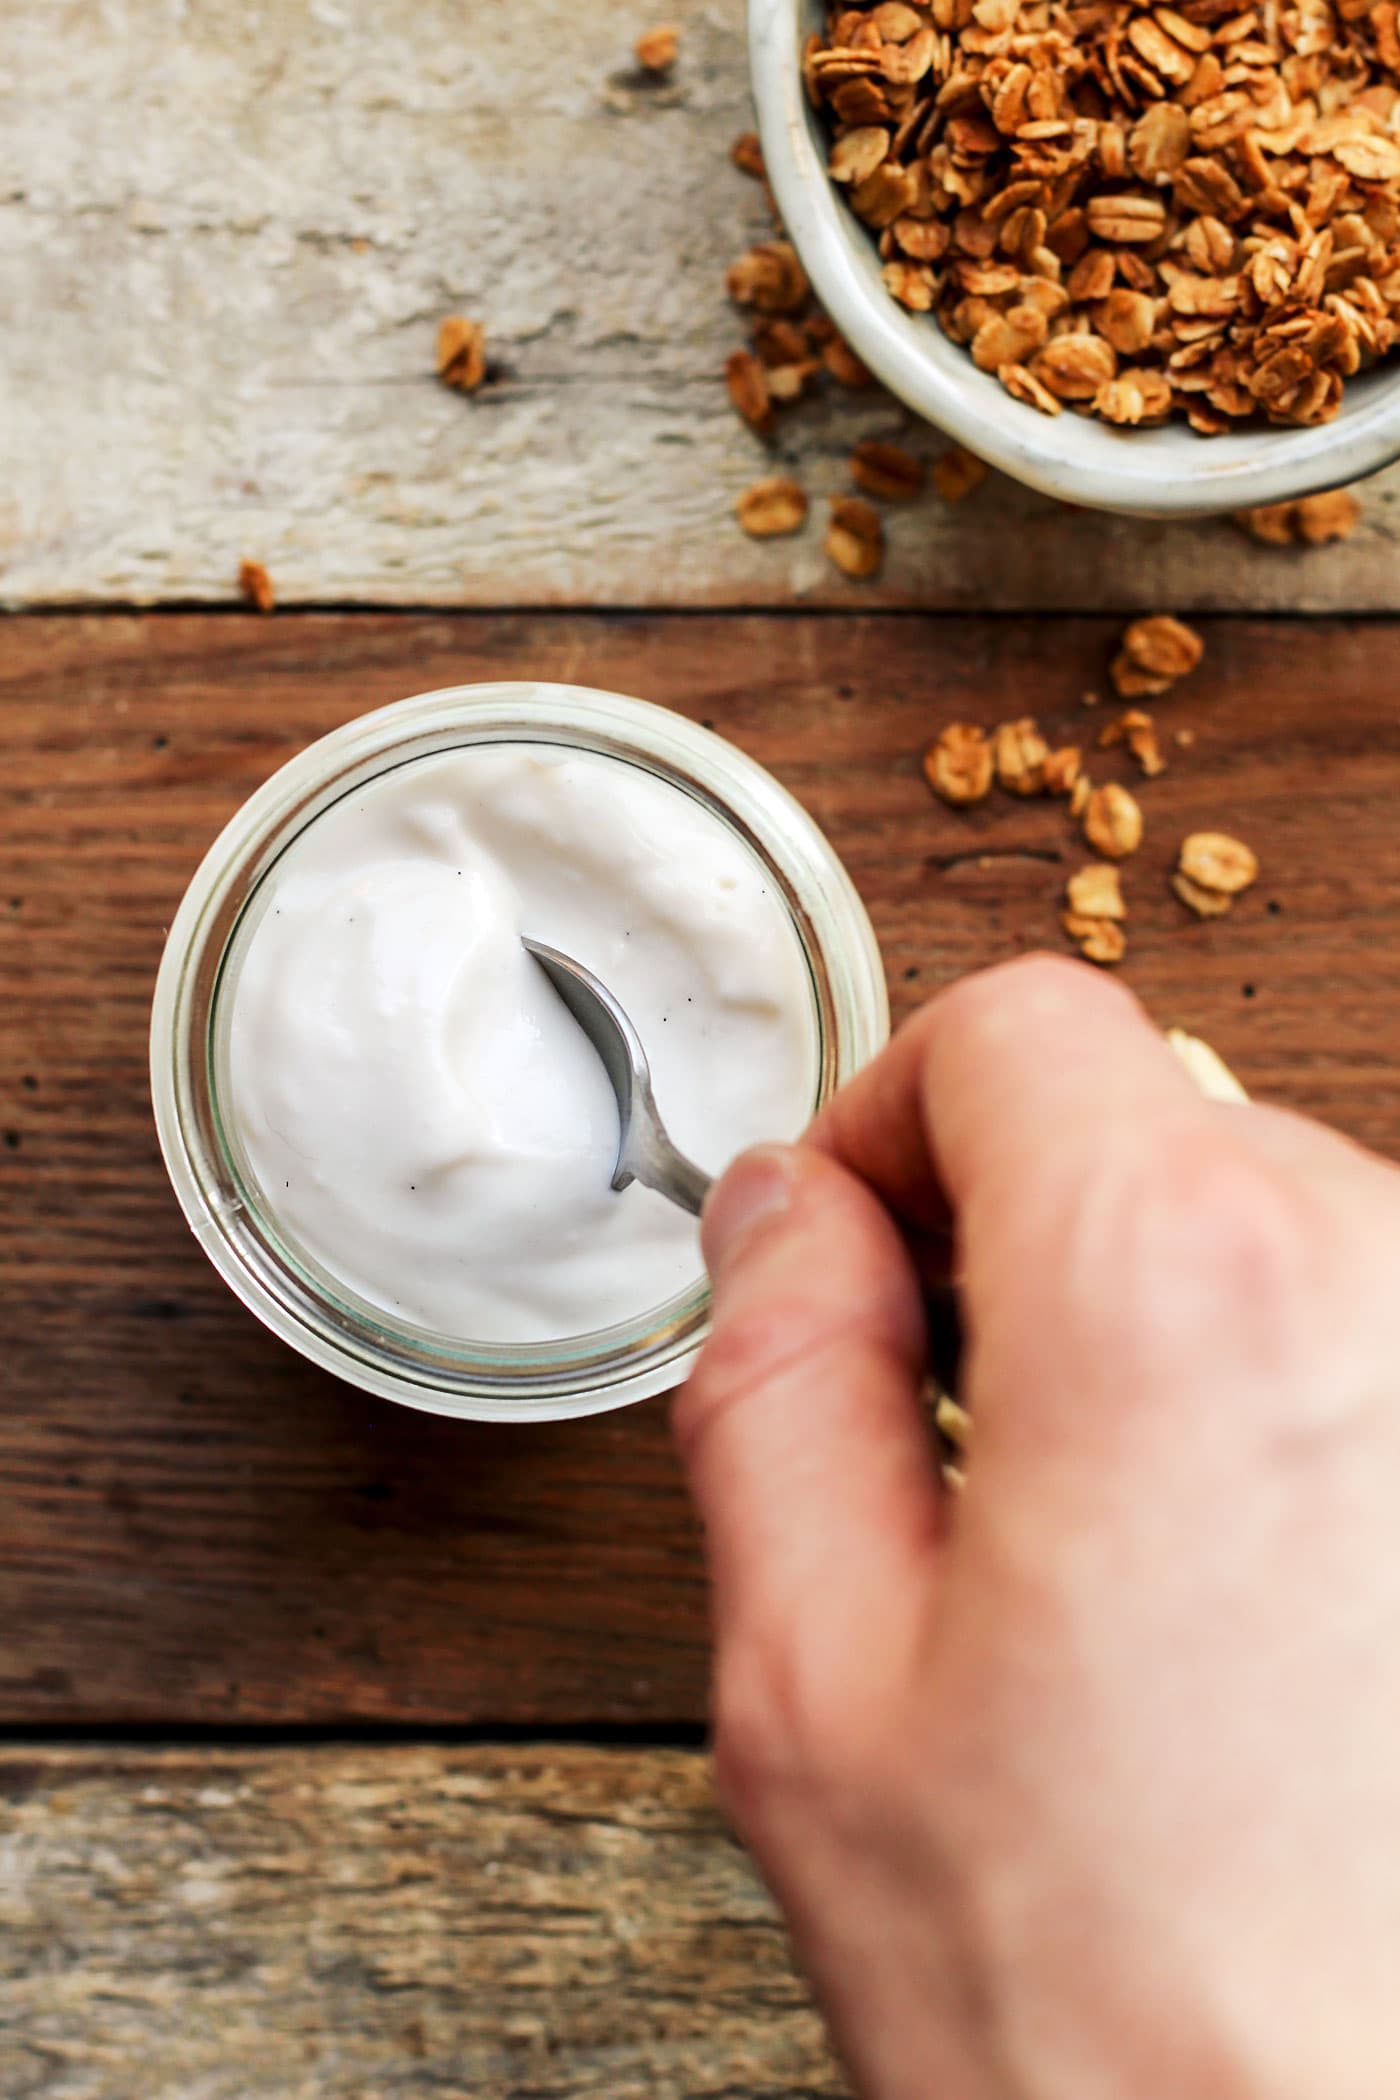
After 6 hours, place the yogurts in the refrigerator for at least 8 hours. Your yogurts are now ready!
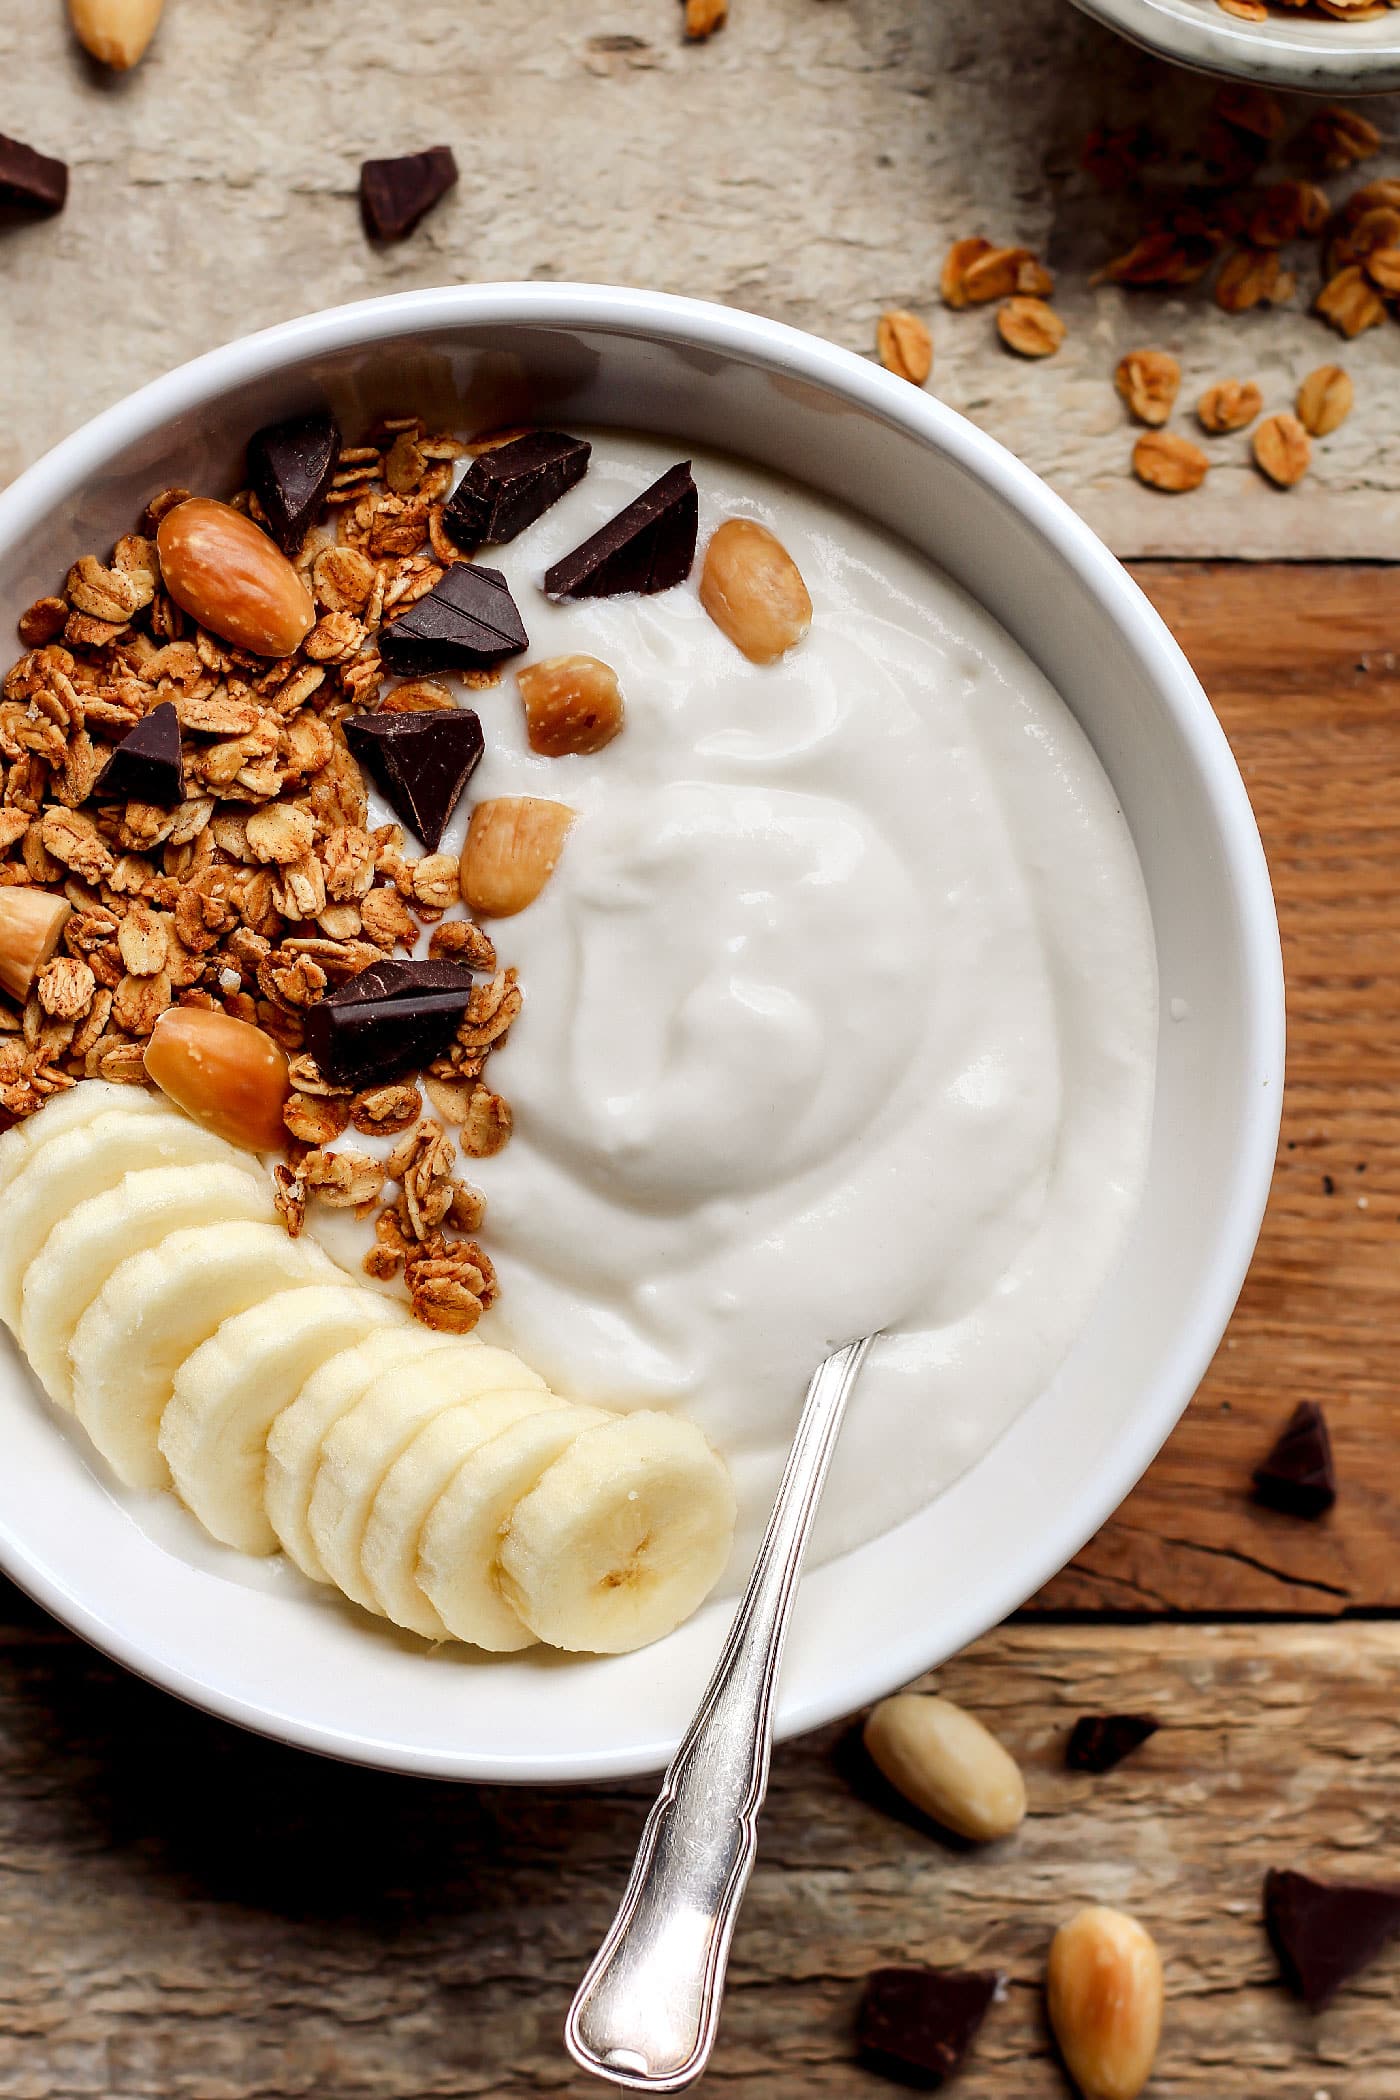
This almond milk yogurt makes a fresh and delicious breakfast. Top with granola, fresh fruits, a drizzle of maple syrup, and some nut butter for healthy fats!
If you plan to make these regularly, you can save 3 tbsp of yogurt and use it as a starter for your next batch.
Greek Style
This yogurt is already quite thick, but if you want an even thicker yogurt, you can get a Greek-style yogurt consistency by draining the whey from the yogurts. To do that, line a fine mesh strainer with cheesecloth, and pour the yogurt into it. Let the strainer rest on top of a bowl to catch the excess liquid, and place it in the refrigerator for 1-2 hours. After one hour, your yogurt should already be thicker. Let it rest longer for a thicker texture.
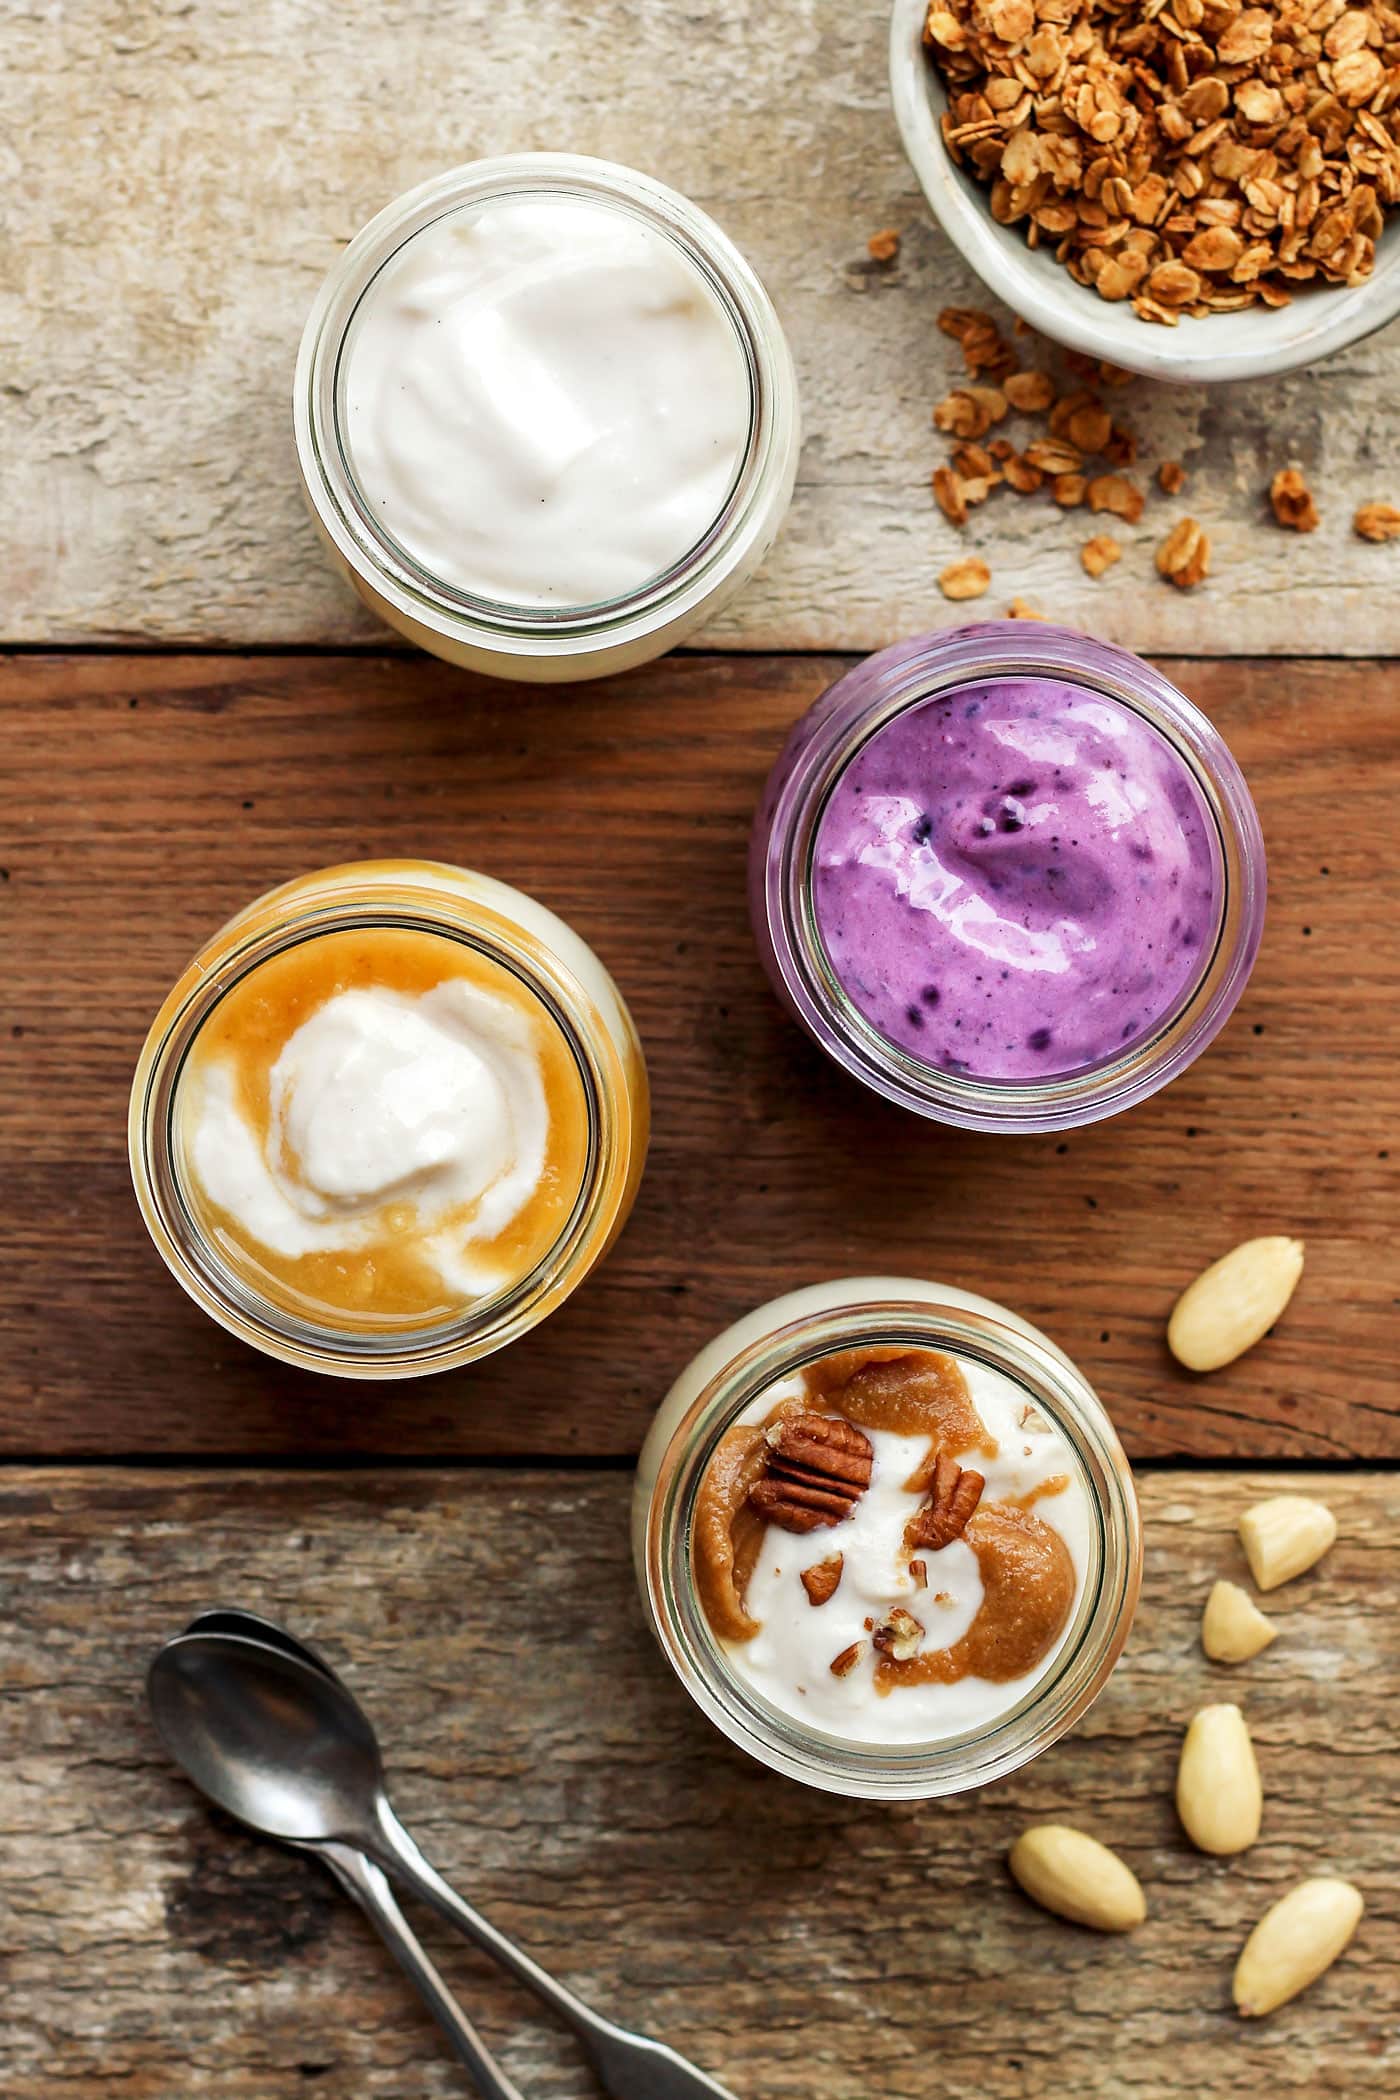
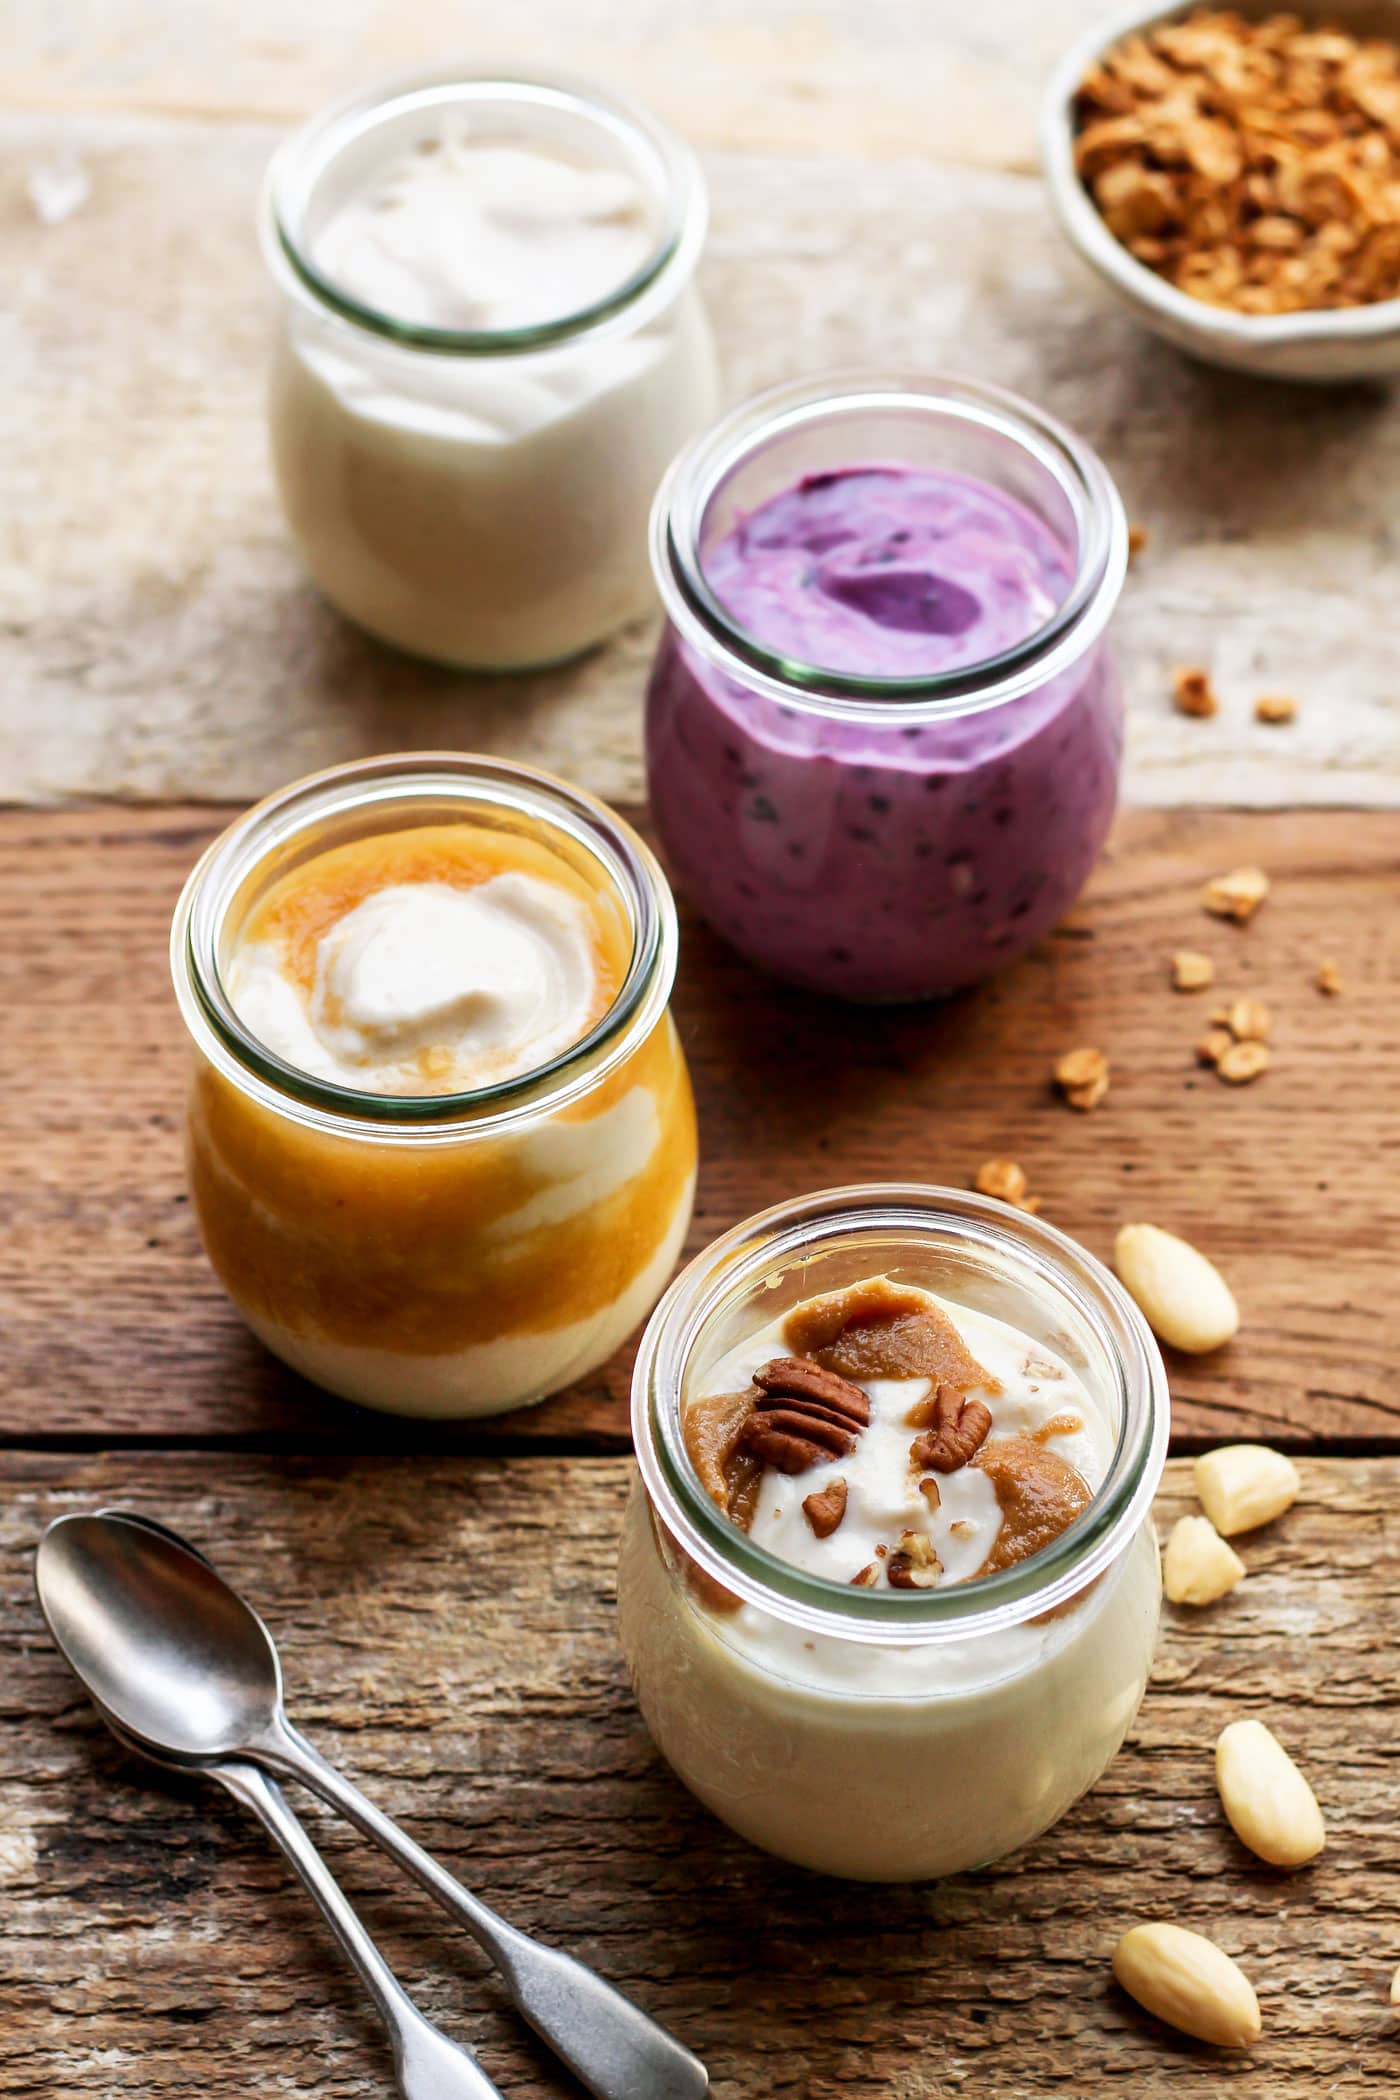
Flavor Variations
Now for those of you who don’t like plain yogurt, I’m sharing 7 variants (not all pictured) to flavor your yogurts. Commercial yogurts almost always contain added flavorings and a lot of sugar. By making your own, you know exactly what’s in there.
- Blueberry: Mix 1/2 cup yogurt with 1/4 cup homemade blueberry jam. I recommend checking Bakerita’s Blueberry Chia Jam recipe for a low-sugar version.
- Peach: Purée 1 large peach with 2 tsp maple syrup. Mix 1/2 cup yogurt with the peach purée.
- Salted Caramel Crunch: In a small bowl, mix 1 tbsp almond butter with 1 tbsp maple syrup and 1/8 tsp salt. Stir the caramel into 1/2 cup yogurt and top with roasted pecans.
- Amaretto: Mix 1/2 cup yogurt with 1/4 cup cherry jam and 1/8 tsp almond extract.
- Nutella: Mix 1/2 cup yogurt with 2 tbsp hazelnut butter, 2 tbsp cocoa powder, and 2 tbsp maple syrup.
- Key Lime: Mix 1/2 cup yogurt with 2 tbsp lime juice. Sweeten to taste.
- Double Chocolate: Mix 1/2 cup yogurt with 2 tbsp cocoa powder, 1 tbsp maple syrup (or more, to taste), and 1 tbsp chocolate chips.
💬 FAQ
I’m afraid I cannot recommend any substitute for this recipe. It’s the combination of the gums and agar that creates the perfect smooth and creamy texture.
Commercial almond milk often contains gums or thickeners, so it’s hard to predict the results. Some brands might work, others won’t. For the best result, I highly recommend making your own almond milk.
Get a 1/8 measuring teaspoon and fill half of it with the agar. Using a knife, remove half of the half to get 1/32. If you are unsure, you can simply double the recipe. In this case, you will use 1/16 teaspoon.
Almond milk yogurts will keep for up to 4-5 days in the refrigerator.
If you are looking for soy-free, coconut-free yogurt, this is it. It’s creamy, smooth, and has the perfect texture!
🧈 More Dairy-Free Recipes
Let me know in the comments if you try this recipe and what is your favorite flavor!
Vegan Almond Milk Yogurt
Ingredients
Almond Milk
- 1 cup raw almonds
- 3 cups filtered water
Yogurts
- 2 and 1/2 cup homemade almond milk
- 1 tsp locust bean gum
- 1/4 tsp xanthan gum
- 1/32 tsp agar powder see notes
- 1 packet of yogurt starter or 2 tbsp non-dairy yogurt I used half a packet of this starter.
- Optional: 2 tsp maple syrup, seeds from 1/2 vanilla bean (or 1/4 tsp vanilla extract)
Instructions
Almond Milk
- Soak the almonds for at least 6 hours or overnight. Drain and add to a blender with the 3 cups of water. Blend on high speed for 30-40 seconds, until smooth.
- Place a nut milk bag over a large glass bowl. Pour the almond milk into the bag and twist to close. Using your hands, squeeze to extract as much almond milk as possible. You should end up with about 2 and 1/2 cups of almond milk.
Yogurts
- Combine the almond milk (2 and 1/2 cups), locust bean gum, xanthan gum, and agar in a medium saucepan. If you want to make a sweetened yogurt, also add maple syrup and vanilla seeds. Heat over medium heat until it reaches 185°F (85°C), whisking constantly to make sure all the gums are fully dissolved and don't stay at the bottom. Remove from heat at soon as it reaches 185°F, just before it boils. Transfer to a large glass bowl and let sit for about 20 minutes or until the temperature reaches 110°F (43°c). This is important. If the milk is too hot, it will kill the culture. Using a thermometer is strongly recommended.
- Once the milk is at the right temperature, stir in the yogurt starter. At this step, the almond milk will have already thickened and may appear gelatinous, don't worry, this is totally normal. Give it a good whisk to break any "lumps," and make it fully smooth again. Pour into glass jars and close the lid, or use plastic wrap to cover.
- Place the jars in a baking dish filled with warm water; they should be half immersed. If you have a yogurt maker, skip this step and just put the jars into your machine.
- Place the baking dish with the jars in a 105°F preheated oven for 6-10 hours, depending on how sour you like your yogurts. Personally, I prefer them with a milder flavor so I let them culture for only 6 hours.
- Transfer the yogurts to the refrigerator and let cool for at least 8 hours.
- Enjoy for breakfast or dessert, sweetened with some maple syrup and topped with granola, fresh fruits, jam, or nut butter. Always give the yogurts a good stir before eating!
- The yogurts will keep for up to 4 days in the refrigerator.
Notes
- To measure 1/32 tsp of agar: fill one-half of a 1/8 measuring teaspoon. Using the tip of a knife, remove half of it to get 1/32 of a teaspoon.
- If you don’t have a yogurt starter or non-dairy yogurt, you can also use probiotics. For this recipe, use 3 capsules of vegan probiotics.
- If you plan to use this yogurt for savory dishes, omit the maple syrup and vanilla.
- Nutritional information is just an estimate and may not be accurate.
Nutrition

About the Author
Thomas Pagot is the founder, photographer, and recipe developer behind Full of Plants. He created the blog in 2016 as a personal cookbook for vegan recipes. Through years of recipe development, Thomas has successfully grown Full of Plants into a trusted resource for plant-based recipes.
🧀 25 Mind-Blowing Vegan Cheese Recipes!
Sign up for the Full of Plants newsletter and you’ll get new recipes delivered by email weekly, PLUS your FREE 100-page printable eBook!
I will be making this yogurt for sure. I love greek style yogurt and I’m trying to cut dairy products from my diet and I was wondering how I will substitute the greek yogurt. Thank you
Just noticed that I have all of the ingredients at home. So I better soak some almonds now!
Can psyllium powder be substituted and in the same amount for xanthan gum? Thank you.
I have absolutely no idea, sorry! But if you try it I would love to hear how it went!
I wonder if you can make in a Instant Pot? Thanks so much for sharing.
I made it in my instant pot, but only the stage two curing. Did the stove top for stage 1
I made it in the Instant Pot. For the first stage, you press the yogurt button twice until it says “boil”. When it reaches 180 degrees, you take the insert out to cool (keep whisking while it cools because the thickeners really start congealing). After it’s down to 110 degrees or less, stir in your starter and then put it on yogurt normal for 6 hours.
But not in the metal right?
Hi Thomas.
I’ve been looking everywhere for locust bean gum, but can’t find it in my country plus no shipping here from Amazon. Can it be replaced with other thing?….
Blessings and can’t wait for you next surprise :))
Hi Vita, it is the same as Johannesbroodpitmeel, Graines de caroubes.
Hope it helps,
E.
Best yogurt I ever had, better than the one made with dairy!
Thank you Thomas,
France
I made this recipe as written and it was great! I’m curious about the need for all the different thickeners and whether heating to 185F is necessary for the thickeners to activate or for pasteurization. Thanks so much! The yogurt was delicious!
This recipe required a lot of tests and I always got the best results by using this mix of thickeners. However, I’m working on an updated recipe that will require fewer ingredients, stay tuned!
Glad to hear you liked the yogurt 😉
I have only the zantham gum and agar agar.
I know it’s an exact science but if you could guess, how much of the xantham gum should I use because I dont have locust bean?
I won’t hold you to it if it doesn’t turn out as good.
Thank you
I love this site.
I appreciate your time and talents!
That’s a tough question…I would say try to increase the xanthan gum by 1/4 tsp, but I can’t guarantee the results. Locust bean gum is essential in this recipe if you want to get a creamy texture.
I’m working on another recipe that won’t require locust bean gum, stay tuned!
He’ll
I bought guar gum hoping to sub it.
I’ll let ya know
I think the hardest part for me about eating healthy and making everything at home is trying to gather up all the ingredients there so lack of where I live. It’s not always convenient for me to order online either. Again I thank you for your expertise here I have tried several recipes and all of them were wonderful my blue cheese just turned blue a few days ago and I’m delighted.
Thank you for everything!
So happy to hear the blue mold is starting to appear on your cheese! Exciting right?
I hope you will like the yogurt recipe as well 🙂
Making the yogurt now 🙂
Interesting things happen in the kitchen (you understand this well lol)
I made the yogurt and when I went to add the cultures they were a funny yellow color and didn’t mix with the milk well. I put everything in my vitamin and blended it, It was frothy :-(. So I added a bit more milk.
I have a feeling the cultures are bad…I will out soon. I hate wasting.
Humm…I guess you cultures were too old, it shouldn’t color the milk and should dissolve well.
Hey Thomas — you still working on the updated yogurt recipe? Would love to hear how that’s going!
On and off, the results are not satisfying enough to share yet, sorry Matt!
I will be anxious to see your new updated recipe.
Just a comment that should of been added into the OP reply. It IS necessary to heat the yogurt at ten mins at the high temperature in order to kill the bad bacteria present in the milk you are using. Then when you lower the Temp and reintroduce only good bacteria, that is what will multiply and the danger zone temp. Bringing something up to a temp to a minute and then reducing back down does nothing, it must be ten mins. Health code and a quick google of the danger zone as well as a basic understanding food safety is your friend.
Without this step you can breed bad bacteria and make you and your family sick.
I would really like to try this recipe, but my oven does not go down to 105. Its lowest setting is 170. Can I use my dehydrator and if so, what temp. Thank-you for your help. Suzie
Hey Suzie, the best temperature to incubate yogurts is between 105-112°F, so you should be able to use your dehydrator with no problem. If you need an exact temperature I would recommend 109°F.
try your crock pot on a low setting and if it to hot crack the lid
Hello!
It looks like a great recipe!
Should I add some sugar, so that the starter works better, or is sugar necessary if using probiotic capsules?
Thank you
Georgia
Hi Georgia,
Sugar is not necessary, I have made many batches without it and it always worked great. I think there are natural sugars in almonds.
I was wondering whether I could skip straining the almond milk if I blanch the almonds to remove the skins and then blend them at high speed in my Vitamix? I do this when making an almond sauce and t is smooth and creamy.
Yes, you can skip the straining step if you do that. I also have a powerful blender but to me, it’s still slightly gritty if I don’t strain it.
Hello again!
Can I use any probiotic For my yogurt or does it need to be the specific one you recommend? I also may have cultures from cultures for health in my cupboard so that will work well.
Looking forward to making the Greek version as I like thick and creamy!
Trying guar gum as I could not find locust bean anywhere.
Thank you again.
D
Hey Debra,
I won’t recommend using any probiotics, some won’t yield good results. It’s safer to go with yogurt cultures or use some vegan yogurt as a starter.
I’ll be giving this another try. By the way, I did use the guar gum and zantham gums and the consistency was perfect! Before I blended it and ruined it anyway…lol
Awesome DebraLee, I will be using guar and xanthan gums too as locust bean gum is hard to find. I’ve got a greek almond yogurt that I bought and will be using this as my starter to get the ball rolling. 🙂
Can you freeze the yogurt for frozen yogurt as an option after the four days? I can’t wait to try this recipe!
I have no idea! I have never tried but I don’t think that would work, you would probably need to add some sugar and fat (cashew cream maybe?) to make it scoopable right from the freezer, otherwise it will be very hard.
Wow. This almond milk yogurt looks incredible! Any chance you have instructions on making it in an Instant Pot?
Love your blog. I, too, am virtually acne-free – for the first time in 40+ years – since eliminating dairy (which, apparently, I’m actually very allergic to). Thanks for all the great dairy-free recipes (can’t wait to try the cheeses)!
Thanks Cheryl! I don’t have instructions to make it in the Instant Pot yet but I think it’s pretty easy. Pour 1 cup of water into the liner and place the steamer rack on top. Then transfer the yogurt to jars and place them on the steamer rack. Cover with a lid and set it on Yogurt mode (on normal) for 7-8 hours.
Glad to hear I’m not the only one who saw huge benefits by going dairy-free 🙂
Hey Thomas,
Great non diary yogurt recipe can you please give us sugar content in 1 cup. I can’t have regular plain whole milk yogurt because it has 10 gms of sugar in 1cup.
Thanks.
Raj.
Hey Raj,
There is no added sugar, you may find some sugar from the almonds but that’s all. It’s probably less than a gram per cup.
Morning Thomas,
Thanks for info on almond yogurt, I have ordered agar agar, xanthan gum ,locust bean gum and mini measuring kit from amazon. So I have two questions, can you use almond milk made from home made almond butter in vitamix, usually make 3 cups raw almond butter and use 1 tbsp for 1 cup of milk. This way there is no left over stuff.
Secondly, I have been using my cuisinart electric yogurt maker for regular cow’s milk, now I can’t because of sugar spike in glucose levels. The container for this machine has a capacity of 50 oz, little more than 6 cups. Your recipe is for 2 1/2 cups, I would like to double it to 5 cups. So will it be OK to double your recipe also.
Good day,
Thanks,
Raj.
Hi Raj,
I doubt it will work, I never heard of almond milk made from almond butter honestly. I don’t think it’s as rich as one made from whole almonds blended with water, and the consistency is probably a bit different. But if you try it let me know!
Yes, it’s totally okay to double the recipe!
I made this with store bought unsweetened vanilla almond milk and it came out amazing! love the salted caramel crunch and double chocolate.
oh and i made it in my instant pot for 6 hours! 🙂
Thanks for your feedback Melissa! I’m so glad to hear you liked the yogurt. It’s also interesting to hear that it worked with store-bought almond milk!
Hi Melissa,
Wondering, which store brand did you buy, I followed Thomas recipe first to make almond milk and then set yogurt.
Thanks,
Raj.
What brand of milk did you use?
What brand store boug3`t? Thanks
What brand did you use? I used store bought and mine turned into a gelatinous mess! Making homemade almond milk to try again!
Hi Thomas,
Success, very first time, followed your instructions and great consistency, hardly any whey, very thick and delicious. No need to strain and I’m sticking with this yogurt, I topped with 1tbsp sugarfree blueberry preserve.
I have saved 3tbsp of this yogurt for next batch, so just to make sure I get it right, I’ll follow the recipe as is and at 110°F add 3 tbsp of saved yogurt. ..right. And this time I’ll make 4 cups of almond milk.
Please advise if any changes to be made.
Thanks,
Raj.
Great! 🙂
That is correct, if you are making about 4 cups of yogurt, add 3 tbsp of your old yogurt at around 110°F. 2 tbsp would probably be enough actually.
Hello again!
I am making this yogurt this afternoon.
How many ml’s are each cup of milk you are using?
Because the culture I have asks for millilitres.
Thank you
So 1 cup equals about 236 ml.
Hello!
I finally made the yogurts yesterday.
The texture was very creamy and milky.
For 500 gr homemade almond milk, I used 1/2 packet of this starter: https://www.ebay.com/itm/Starter-culture-for-Original-Bulgarian-natural-home-Yogurt-Yoghurt-for-5-or-10-l/262832676291?ssPageName=STRK%3AMEBIDX%3AIT&var=561830910891&_trksid=p2057872.m2749.l2649.
The only thing is that I would prefer my yogurt to be more sour, but I belive this is a matter of the yogurt starter.
Perhaps, I shall use more quantity for my next batch.
The combination of the thickeners used in this recipe is great, the best of all I have used so far.
Thank you
Hi Georgia,
I’m glad to hear you liked the texture of the yogurts! The thickeners are not super easy to find but I really think this combination yields a good consistency.
If I can give you one advice, do not increase the amount of starter. It won’t make them more sour and you will probably end up with a lot of “whey”. If you want more sour yogurts: use a teaspoon of your favorite yogurt as the starter and/or increase the incubation time.
Thank you Thomas!
I follow your advice for my next batch!
Congrats as well, for your fantastic toppings!
Hello again Thomas!
I raised the incubation time to 11 hours and the taste is amazing!
One more question.
If i wanted to have a thicker yogurt,what could I do?I read what you write about greek style yogurt,but mine has no whey i guess.
So,what if i raised the amount of agar agar?whould it thicken the yogurt at all?
Thank you again for the great recipe.
Great! 🙂 By increasing the amount of agar you will probably end up with a texture a bit more gelatinous. Maybe try increasing a bit the xanthan gum.
Would you clarify what a “nut milk bag” is? Where might one get one? Could you post a photo of this part of the process?
Thanks so much!!!!
A nut milk bag is a tissue bag used to strain the milk from the pulp. You can find it on Amazon: http://a.co/iC60pHC
Hello! Thank you for sharing your research and success, finally something without coconut!
I have a question: can I boil the agar and gums appart or with a small amount of almond milk, and then mix it with the rest? I would like to make raw yogurt if possible.
I was wondering also about sunflower or flaxseeds. Has anyone tried making yogurt with them?
Almond is great also because coconut is so full of saturated fat. your recipe is more ecologic and healthier!
Hi Léna!
You can probably boil the agar and gums with half, or a quarter of the almond milk but not less as it might thicken too much and you will have trouble mixing it with the cold almond milk after. Let me know if you try it! Personally, I have nothing against coconut, I think everything in moderation is okay.
Thank you so much for this recipe. I can’t wait to try it. How many days will this yogurt keep?
Thank you!
It will keep for up to 4 days, maybe a few more days.
Hi, do you keep the oven on for the entire 5 hours at 105?
Hi Rachel, yes that is correct! Or you can use a yogurt maker, or the Instant Pot to incubate the yogurts!
Hi! So I made this recipe yesterday and discovered that the locust bean gum never fully dissolved before it reached 180 degrees. Has this ever happened to you? While the yogurt is pleasant (LOVE that authentic almond, slight-cherry flavor), it is not super smooth. Oh, and I’ll def let it sit in the oven longer next time to make it more sour 🙂 .
Hi Stefanie! It never happened to me, but maybe try to blend the milk with the gums in your blender first, and then heat it. That should help.
Glad to hear you like the taste though 🙂 Hope it will be smoother next time 😉
I’m completely happy with this recipe! The yogurt is better than I imagined. The instructions were great and straightforward and the recipe is relatively easy. I’m not the biggest coconut yogurt fan and was happy to find a different plant based alternative. Thanks for sharing
Thanks for the feedback Dewayne! Happy to hear you liked the yogurts 😉
Hi! I just made this recipe and the flavor of the yogurt was really nice, thank you so much for the info on thickeners, this is the first recipe that’s really worked for almond milk yogurt! I do have a question on consistency. My yogurt developed a thicker top layer when it was in the fridge, I mixed together before eating, but it made it a little chunky. Do you have any ideas what might have caused that? I’m not sure if the amount of yogurt started I used was off. Thank you! 🙂
Hi Stephanie,
Glad to hear you liked it! Did you cover the yogurts with plastic film in the fridge? I guess the top dried and formed a skin like it would on custard.
I love the detail of this recipe! thanks for explaining why you are doing each step, there are so many variations of vegan yogurt recipes I appreciate knowing your logic/science behind each step. Great explanations. I am trying this with Silk cashew milk instead of homemade, which I am hoping will work with our the addition of the gums because there are already Locust gum and several other gummy additives to that product.
You’re welcome! Honestly I’m not sure it will work with store-bought milk, tweaking this recipe is a bit complicated as I created it specifically for natural almond milk. Let me know if you try it!
Just wanted to comment that 1/2 of 1/8 is 1/16, not 1/32 so you may want to correct that. Looking forward to trying the recipe, sounds great! Have you tried doubling the ingredients?
Thanks for your input Mike, the 1/32 tsp measurement is correct. As explained in the notes, you fill half of a 1/8 tsp which equals 1/16 tsp. Then use a knife to remove half of it so you get one-quarter of 1/8 tsp which equals 1/32. This recipe can be doubled and will actually make measuring the agar easier 🙂