This post may contain affiliate links. Please read our disclosure policy.

Infused with pure peppermint oil for freshness and loaded with plenty of chocolate chunks for crunchiness, this vegan mint chocolate chip ice cream is a real treat! It’s scoopable straight from the freezer and unbelievably creamy. Nut-free and 100% dairy-free!

⭐️ Why You Should Try This Recipe
- Nut-free. Forget about cashews. This vegan ice cream combines plant-based milk and oils to create the creamiest consistency without the nuts. It results in a much lighter texture than cashew-based ice creams and is much easier to digest.
- Airy and scoopable. If you are looking to re-create the mouthfeel, scoopable factor, and richness of commercial vegan ice cream, look no further! This recipe has been designed to do just that. You can scoop it without having to let it sit on the counter for a few minutes.
- Super fresh. Pure mint essential oil brings a lot of freshness and a floral, minty aroma that will leave you craving for more!
- Cheaper than store-bought. Coming at about $2 a pint, this homemade ice cream is much cheaper than the one you can find at the store. Plus, you know precisely what is inside!
🍫 What is Mint Chocolate Chip Ice Cream
Mint chocolate chip is a popular ice cream flavor that is infused with mint (peppermint extract or fresh mint can be used) and chocolate chips.

🌿 Ingredients Notes
Before diving into the ingredients, be aware that this recipe does require a few special ingredients you might not have on hand. Here is what you will need:
- Plant-based milk – You can use any unsweetened plant-based milk. I usually use soy milk, which contains 1.8g of fat per 100g. If using almond or oat milk, which are generally lower in fat, you might have to slightly increase the amount of oil.
- Coconut oil – Preferably deodorized coconut oil to prevent the coconut flavor from overpowering the mint. To make this recipe coconut-free, replace the coconut oil with deodorized cacao butter.
- Oil – Use a neutral liquid oil like sunflower, canola, or rapeseed oil.
- Sugar – Use granulated white sugar. Coconut or brown sugar would alter the overall flavor.
- Dextrose – Dextrose lowers the freezing point, creating a scoopable consistency straight from the freezer. Do not omit or substitute it.
- Gums – I went with lecithin to emulsify everything, and a mix of locust bean gum and guar gum to improve the texture and reduce the formation of crystals.
- Peppermint essential oil – Ensure you are using food-grade peppermint essential oil.
- Vanilla extract – Just a hint of vanilla extract to round up the overall flavor.
- Chocolate chips – You can use regular chocolate chips, mini chocolate chips, or dark chocolate chunks. You can read more about the different options below.
- Matcha – Optional. We will use matcha powder to give the ice cream a green hue.
Quick disclaimer: This recipe is not designed to be the healthiest or use minimal ingredients. The goal was to recreate the texture and mouthfeel of commercial vegan ice cream.
🥣 How to Make Mint Chocolate Chip Ice Cream
Make the base
- Heat the milk. Add the milk, deodorized coconut oil, neutral oil, vanilla extract, and mint oil to a saucepan. Heat over low-medium heat until the coconut oil has melted.
- Whisk together the dry ingredients. Whisk together the sugar, dextrose, lecithin, and gums in a small bowl.
- Combine everything. Add the dry ingredients to the saucepan and heat the mixture until it reaches 170°F (75°C), constantly whisking. You must bring the ice cream base to this temperature to activate the gums.
- Blend. Finally, transfer the ice cream base to a high-speed blender and blend for 5-10 seconds. This will help emulsify everything.
- Chill. Transfer the ice cream base to a large bowl and chill in the refrigerator overnight or for at least 12 hours.


Churn
Once the ice cream base has chilled overnight, it’s time to churn it. To do so:
- Turn on your ice cream maker and slowly pour in the chilled mixture.
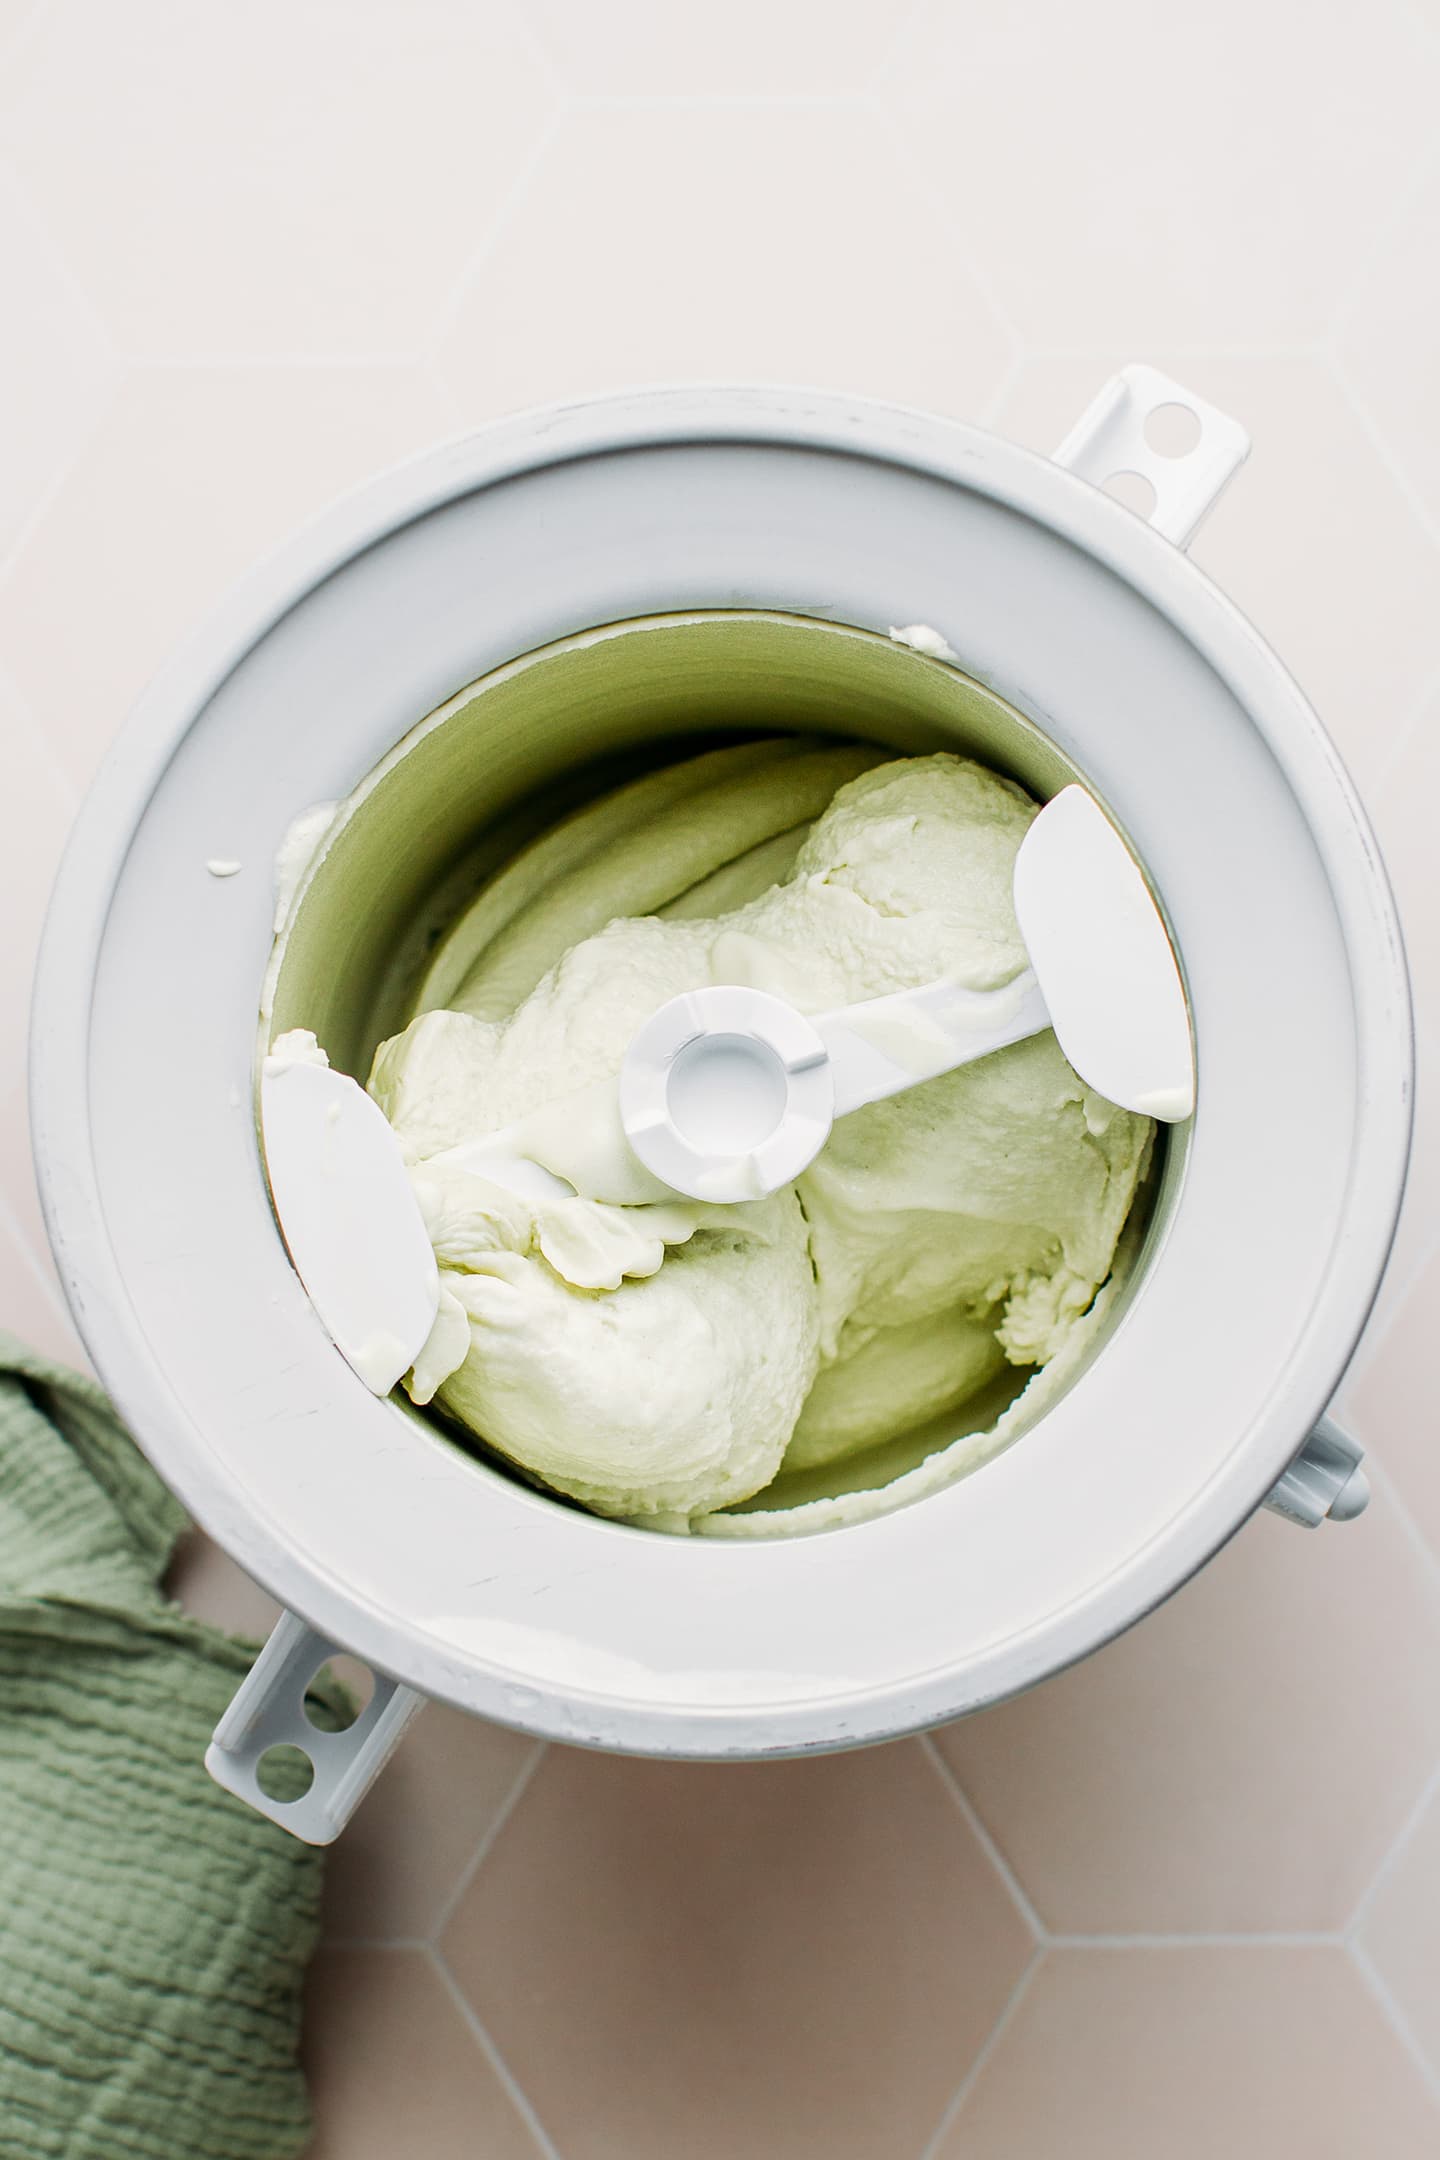
- Churn on the lowest speed (I used the Kitchenaid attachment on speed 1) for 20-25 minutes or until the texture resembles soft-serve ice cream.
Note: This is not a no-churn ice cream recipe, so you will absolutely need an ice cream maker. You can use a regular ice cream maker or a Kitchenaid fitted with the ice cream attachment.

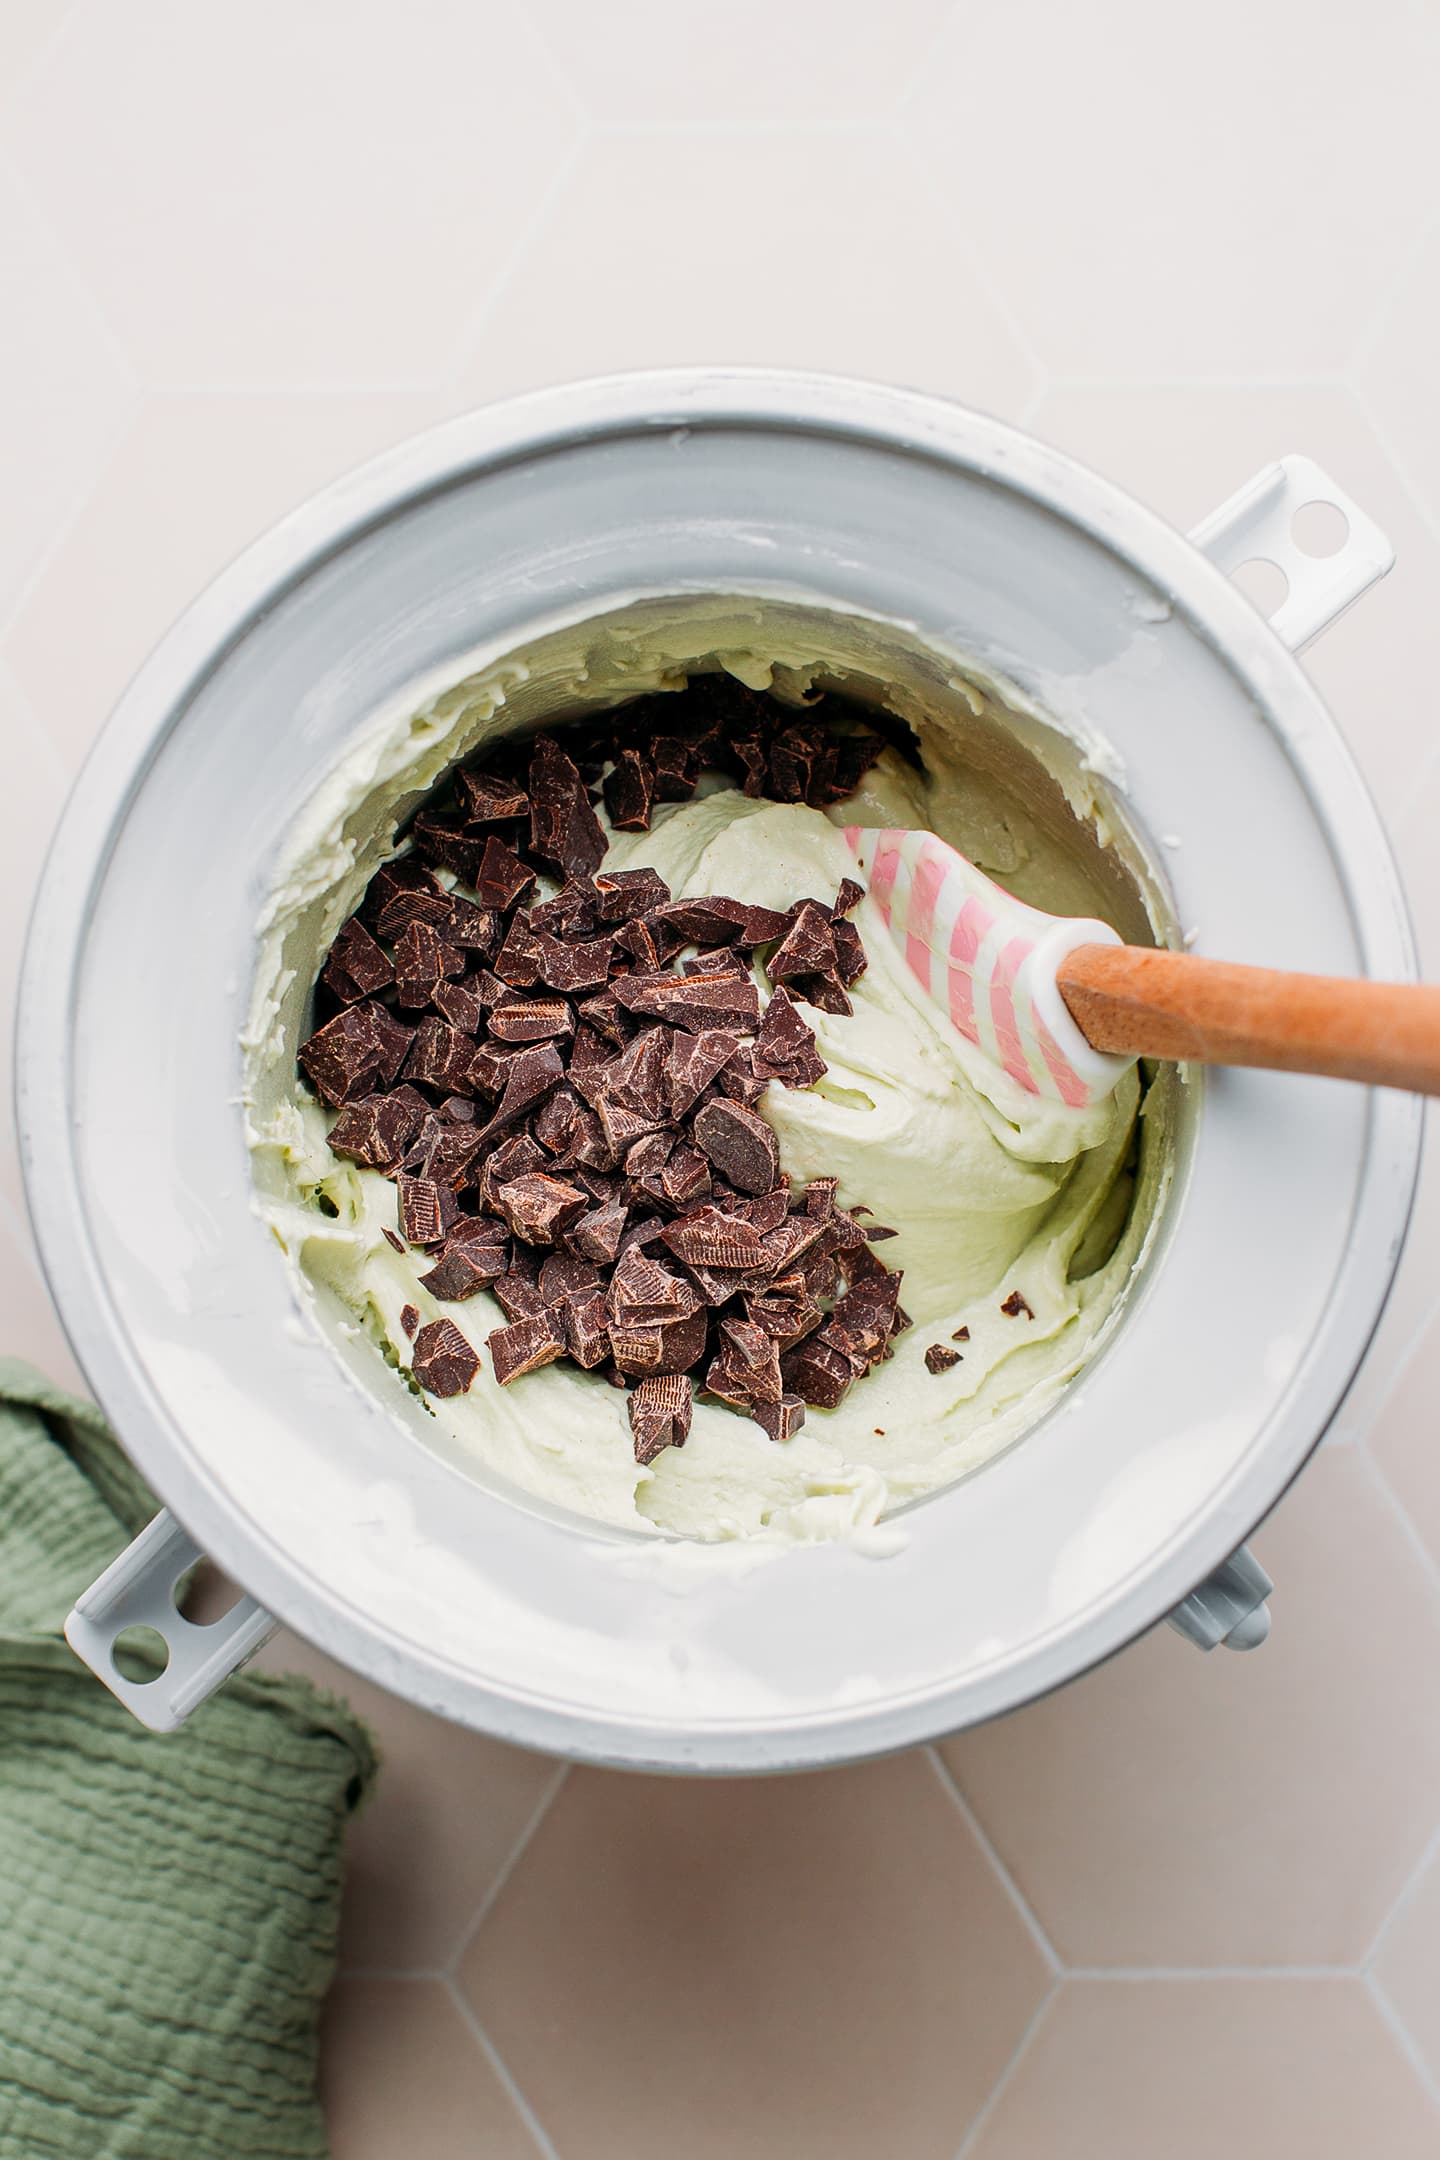
Add the dark chocolate
- Once the ice cream is churned, add the chopped dark chocolate and stir using a spatula to distribute it evenly.
- Transfer the ice cream to a freezer-safe container and freeze for at least 6 hours before enjoying it!
Chocolate chunks vs. fine shavings
When it comes to the chocolate, you have several options. The first one consists of chopping dark chocolate into small chunks. This will yield a crunchy texture, perfect for those who like ice cream with a bite. The second one consists of using mini dark chocolate chips, yielding a more subtle crunch. Finally, the last option, which we could call “Stracciatella style,” requires melting the dark chocolate, drizzling it into the churned ice cream, and breaking it into small pieces using a spatula. This will create fine chocolate shavings.
Whichever option you choose depends on your preference or mood. Personally, I love crunchy chunks of chocolate but also appreciate the delicate texture of chocolate shavings from time to time.

🍪 What to Serve With This Ice Cream
You can serve this ice cream in waffle cones or small ramekins. It’s also delicious served on top of chocolate desserts like vegan brownies, chocolate cake, or even chocolate banana bread!
📔 Tips
- Adjust the size of the chocolate chunks. Depending on your preference, you can chop the chocolate into large chunks or smaller ones. Alternatively, you can use mini chocolate chips.
- Make it Stracciatella-style. Instead of stirring chocolate chunks into the ice cream, melt the chocolate over a double boiler. Once melted, drizzle it slowly over the churned ice cream, and use a spatula to break it into small pieces and incorporate it.
- Ensure your ice cream bowl is cold enough. Your ice cream bowl must be completely cold to churn the ice cream well. Please leave it in the freezer for at least 15 hours before using it.
- Let the mixture chill overnight. Don’t try to churn the ice cream base if it is still warm, it simply won’t work. It must be refrigerated for a minimum of 12 hours.

💬 FAQ
I do not recommend omitting or substituting the dextrose as it will impact the final consistency of the ice cream. It is essential to create a scoopable texture.
Yes, you can use fresh mint. To do so, heat the plant-based milk until it comes to a simmer. Remove from heat and add about 1/2 cup of packed fresh mint to the milk. Let steep for 3-4 hours. Strain and follow the rest of the recipe. Be aware that the flavor will be milder when using fresh mint.
Mint extract is not as strong as essential oil, so you must use more. I recommend starting with 1/4 teaspoon of mint extract and adding more to taste.
Yes, lecithin can do small clumps. Do not worry, as they will be fully incorporated during the blending step.


Vegan Mint Chocolate Chip Ice Cream


Ingredients
- 670 ml unsweetened plant-based milk I used soy milk
- 88 g deodorized coconut oil
- 45 g neutral oil canola, sunflower, or rapeseed oil
- 1 tsp vanilla extract
- 1/8 tsp peppermint essential oil
- 122 g granulated sugar
- 55 g dextrose
- 2 g lecithin powder about 1 tsp
- 1 g locust bean gum about 1/2 tsp
- 0.5 g guar gum about 1/4 tsp
- 1/2 tsp matcha powder dissolved in 1 tbsp water
- 140 g chopped dark chocolate or mini chocolate chips
Instructions
Make the ice cream base
- Heat the milk. Add the plant-based milk, deodorized coconut oil, neutral oil, vanilla extract, and peppermint oil to a saucepan. Heat over low-medium heat until the coconut oil has melted.
- Whisk together the dry ingredients. Whisk together the sugar, dextrose, lecithin, locust bean gum, and guar gum in a small bowl.
- Combine everything. Add the dry ingredients to the saucepan and heat the mixture until it reaches 170°F (75°C), constantly whisking. You must bring the ice cream base to this temperature to activate the gums. Once it has reached that temperature, remove it from heat and let it cool for 5-10 minutes.
- Blend. Finally, transfer the ice cream base to a high-speed blender. Add the dissolved matcha if using, and blend for 5-10 seconds. This will help emulsify everything.
- Chill. Transfer the ice cream base to a large bowl and chill in the refrigerator overnight or for at least 12 hours.
Churn the ice cream
- Once the ice cream base has chilled overnight, it’s time to churn it. Turn on your ice cream maker and slowly pour in the chilled mixture.Churn on the lowest speed (I used the Kitchenaid attachment on speed 1) for 20-25 minutes or until the texture resembles soft-serve ice cream.
- Once the ice cream is churned, add the chopped dark chocolate and stir using a spatula to distribute it evenly.
- Transfer the ice cream to a freezer-safe container and freeze for at least 6 hours before enjoying it!
Notes
- Adjust the size of the chocolate chunks. Depending on your preference, you can chop the chocolate into large chunks or smaller ones. Alternatively, you can use mini chocolate chips.
- Make it Stracciatella-style. Instead of stirring chocolate chunks into the ice cream, melt the chocolate over a double boiler. Once melted, drizzle it slowly over the churned ice cream, and use a spatula to break it into small pieces and incorporate it.
- Ensure your ice cream bowl is cold enough. Your ice cream bowl must be completely cold to churn the ice cream well. Please leave it in the freezer for at least 15 hours before using it.
- Let the mixture chill overnight. Don’t try to churn the ice cream base if it is still warm, it simply won’t work. It must be refrigerated for a minimum of 12 hours.
Nutrition

About the Author
Thomas Pagot is the founder, photographer, and recipe developer behind Full of Plants. He created the blog in 2016 as a personal cookbook for vegan recipes. Through years of recipe development, Thomas has successfully grown Full of Plants into a trusted resource for plant-based recipes.
🧀 25 Mind-Blowing Vegan Cheese Recipes!
Sign up for the Full of Plants newsletter and you’ll get new recipes delivered by email weekly, PLUS your FREE 100-page printable eBook!
Looks amazing! I’ll definitely try this! Have you tried using homemade oat milk? I’m wondering because I believe it will thicken a lot during heat. Would that be a problem?
Have you tried tara gum yet? I’ve been using it but I haven’t found consistent information if I it should be heated for some time after reaching the activation temperature.
I haven’t tried using homemade oat milk or tara gum, sorry.
Regarding the thickness, it shouldn’t be a problem as long as it doesn’t end up being thick like pastry cream.
Yum! This looks good!
Thanks Tetyana 😉
I love chocolate ice cream. Vegan mint will bring a new taste for me. I’ll try it.